At the end of the academic year you will need to graduate students, withdraw any students not returning and promote reenrolling students to the next grade level. Before you do this, however, make certain you have backed up your data. It is important that you follow the steps below in the order outlined.
- First, withdraw any students not returning to the school for the next academic year.
- Next, graduate all students who are graduating.
- Lastly, promote all remaining students to the next grade level. If there are students who are being retained in their current grade level you will deal with these on a student-by-student basis.
Withdrawing Students
As students withdraw from the school (this does not include graduating students), you will want to indicate this in their student record in AVSTUDENTS. Be certain that your data is backed up prior to withdrawing students.
- Navigate to Home > View/Edit Student records > Profile > Guidance/Enrollment.
- Find the student you wish to withdraw.
- Check the Withdrawn checkbox.
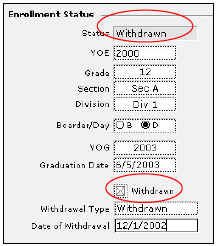
- Select Withdrawn from the Withdrawal Type pull down list.
- The enrollment Status will change appropriately.
- Enter the date the student withdrew from the school in the Date of Withdrawal.
Graduating Students
- Navigate to Home > View/Edit Student records > Profile > Guidance/Enrollment.
- Find the students you wish to graduate by performing a FileMaker Pro Find in the Grade field.
- Check the Withdrawn checkbox.
- Select Graduate from the Withdrawal Type pull down list.
- The enrollment Status will change appropriately.
- Enter the date the student graduated from the school in the Date of Withdrawal.
- Do this for every record in your found set.
Promoting Students
When promoting students, begin with your highest grade and promote those students first. Then follow with the next lower grade. Continue until all students have been promoted.
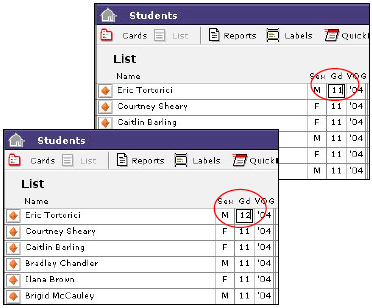
- Using FileMaker Pro’s Find, perform a find all 11th graders.
- Navigate to AVSTUDENTS > List.
All your current 11th graders will display in the list.
- Change the grade IN THE FIRST record from 11 to 12.
- Ensure that your cursor is still sitting in the first record Gd field. If not, you may accidentally replace data in other fields.
- Select Replace Contents from the FileMaker Pro’s Records menu at the top of the screen.
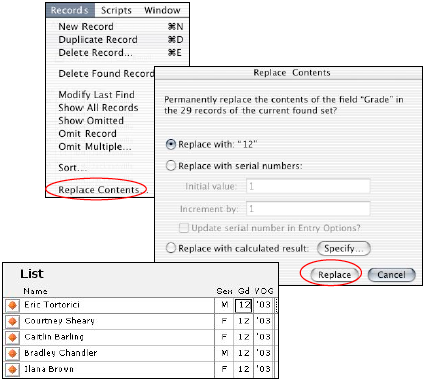
- Read the message box carefully. It should tell you that you are about to permanently replace the contents of the field Grade with “12” in “X” number of records.
- Click Replace if this information is correct.
All of your 11th graders have now been promoted to 12th graders.
- Next find all your 10th graders and promote them to 11th grade by repeating the above steps.
- Continue doing this through the grade levels until all your students have been promoted.
Caution: Once you have replaced field information in multiple records, there is no undo. You will want to ensure that your files have been recently and properly backed up before proceeding.