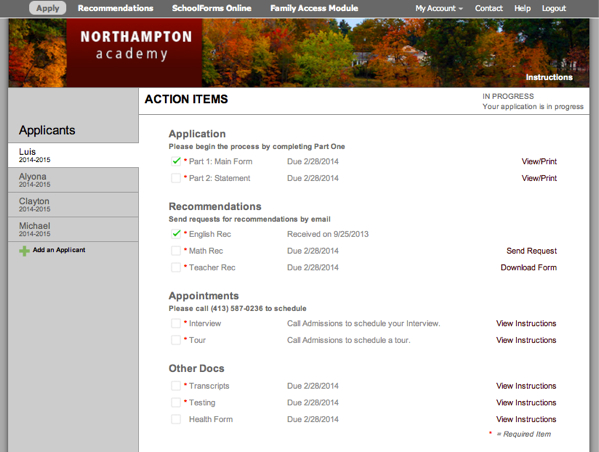
When an applicant logs in to their account, they will see a list of Action Items, which correspond to the Process Status Items in PORTAL. As items are received by the Admissions Office, they are marked as complete in PORTAL, and the applicant is notified via PWS. Families will be able to see how their application is progressing as the status of action items change.
This is what the family sees:
The display of action items that families see in their PWS web account is controlled in PWS Sources Main > Notifications tab.
This article explains how to configure Notifications.
Setting Up Process Status Items in PWS
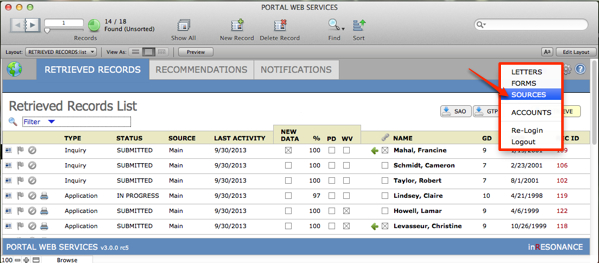
- Within PWS, click More > Sources. This will open the PWS: SOURCES window.
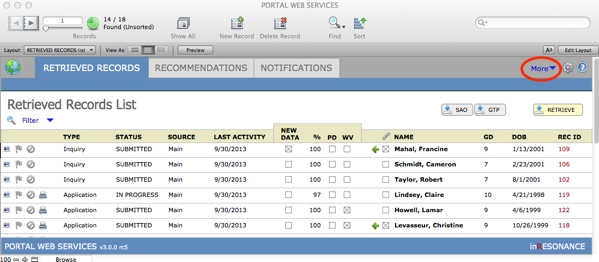
NOTE: Depending on what is configured for you, you will see Main, GTP, or SAO. If you do not accept these other online application sources, you will be automatically directed to the PWS: SOURCES MAIN screen as depicted in Step #3, below.
- Click the green arrow next to Main. You will be taken to the PWS: SOURCES MAIN screen.
![]()
- Click the Notifications tab > Process Status Items subtab.
- During setup the Refresh button was clicked to bring in your Process Status Items from PORTAL. DO NOT refresh again unless you make changes to the Process Status Items inside PORTAL.

IMPORTANT: After you make changes on the Notifications screen, you must click the Upload button to push your changes to the web site.
Review Process Status Items Setup and Attributes
The list of Process Status Items on the left approximates the list of items (called Action Items on the web site) that a family will see on the web site, in order from top to bottom.
The Process Status Items tab consists of a list of all items, on the left, and details for any item in the list, displayed as Attributes for a selected item, on the right.
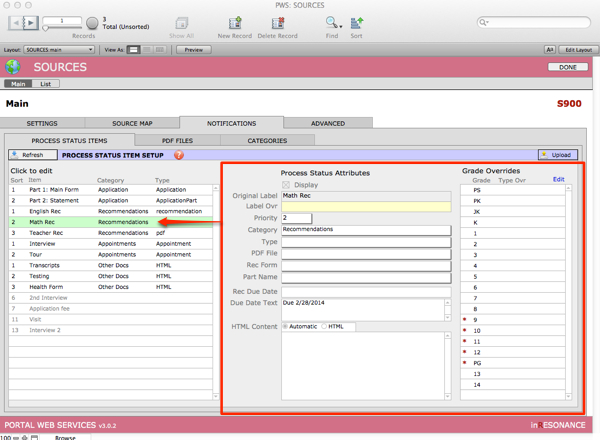
Process Status Items Setup List
In the list on the left, items are sorted first by Category, as set on the Categories subtab; then they are ordered within Categories by the Sort order in Process Status Items Setup—the list on the left. This order is controlled by the Priority set in the individual item’s Attributes.
- To see the Attributes for a Process Status Item, click the item in the list on the left. Attributes for the selected item will appear on the right.
- Display checkbox – You can choose which process status items are displayed online by checking or unchecking the Display checkbox. You will not want to display the Application Fee, since it is part of the application itself.
- Original Label – This is the default label for the item. You can change how the Action Items’ Labels are displayed by editing the appropriate label field. Note: The label needs to remain true to what the item actually is because these labels correspond to actual fields within PORTAL.
- Label Ovr – Enter into this field a label to override the original label.
- Priority – Select from the drop-down menu a number that sets the item’s priority within the items displayed in its Category.
- Category – Set each item into a Category under which it will be displayed as an action item online. Categories are first defined on their own subtab in Notifications.
- Type – There are six different Types of Process Status Items that can be chosen; every item that is displayed must have an associated type, including:
- Application
- ApplicationPart
- Appointment
- HTML
- Recommendation
- PDF File – The PDF files you have uploaded on the PDF subtab will display in this drop-down menu. If the item is a PDF, select the correct file here. This type allows you to attach a downloadable PDF to an Action Item (e.g. a math or English recommendation form). This will provide a link on the website labeled Download Form, which, when clicked by the applicant, will automatically download the form for the applicant to use. For more information on PDFs see the section below, Uploading PDF Forms.
- Rec Form – The recommendation forms built in PWS will display in this drop-down menu. If the item is an online recommendation form, select the correct form here. This type allows you to attach an online recommendation request form, which, when emailed to a teacher by the applicant, allows the teacher to create an online account where they can complete and submit the form to the school electronically.See the article Online Recommendations for more information on building recommendation forms.
- If your form is not ready, or if you do not want to use an online Recommendation form, change the type to PDF and add your Recommendation form as a PDF.
- Part Name – If the item is an ApplicationPart, select the correct part here.
- Rec Due Date – If the item is a recommendation, enter the Due Date text here as you wish it to display on the web site.
- Due Date Text – For all items other than recommendations, enter the Due Date text here as you wish it to display on the web site. You may also enter text explaining the due date (e.g. “Due two weeks after your visit.” instead of a specific date).
- HTML Content – Content is where you enter instructions for the web site action item on how to complete an item of type HTML or Appointment. This is appropriate for transcripts, school reports, etc.
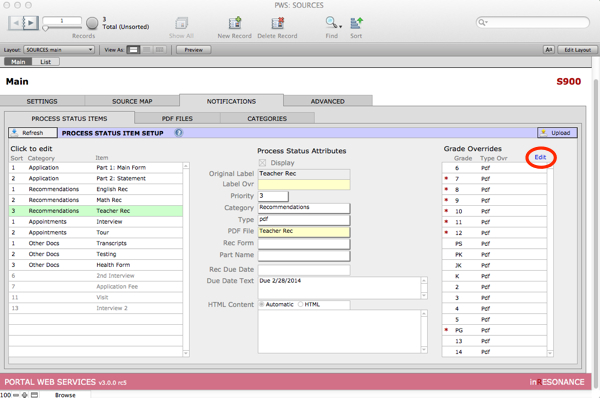
Specifying Process Status Items by Grade
The Process Status Items on this screen are the default items. If some grades will be an exception—for instance, if you assign the US Math Recommendation form to grades 9–12, but a LS Math Recommendation form for grades 6, 7 and 8—you will set up grade-by-grade overrides.
NOTE: You do not have to enter any settings for grades that will conform to the default settings you stipulated on the Process Status Items Setup screen. Only the grades that have a different item (or no item) than the default should be described on the Grade Overrides screen.
- From the Process Status Items Setup screen, select the item from the list on the left that will require grade-by-grade settings. See the Grade Overrides area on the right.
- Click Edit to open the Process Status by Grade window.
Here you can indicate the instructions, the labels, and the type on a per grade basis. More, you can choose to display and require on a grade-by-grade basis.

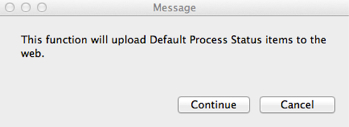
- Click Upload to publish your changes before closing PWS: SOURCES MAIN. This will open a dialog box confirming that this will upload Default Process Status Items to the web.
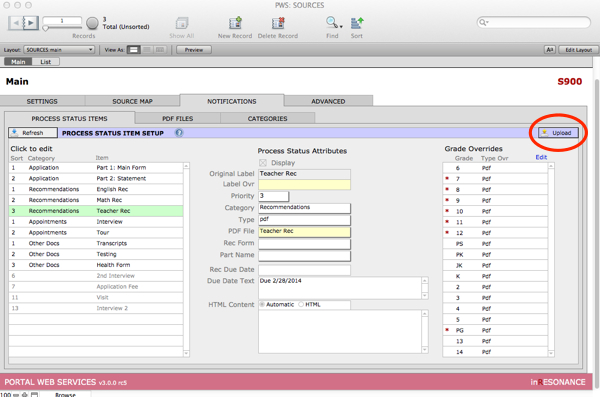
- Click Continue to update the online forms.
Uploading PDF Forms into Notifications
To attach a PDF form to an Action Item, first you must upload it into Notifications > PDF Files. Once it has been uploaded, the file will be available for you to select on the Process Status Items subtab, in the Attributes drop-down menu of PDF files.
- Navigate to PWS: Sources Main > Notifications tab > PDF Files subtab. A list of PDFs already available to attach to action items appears on the left; on the right is displayed details about the form.
- Click on a PDF in the list to edit its label.
- With the PDF selected, use the Browse button to swap out a PDF and replace it with a different PDF.
- Click on the red X next to a PDF in the list to delete it. Be careful not to delete any PDF that is currently in use!
- To add a new PDF, click +Add File.

- A New File will be added to the list on the left.
- Edit the Label (this will change the name of the form on the left), and use the Browse button to find the new PDF and insert it into the list.
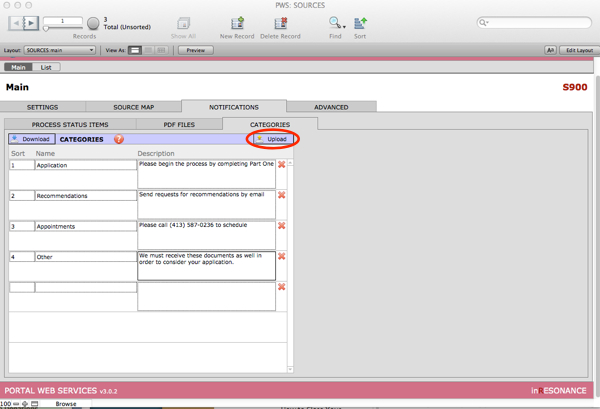
Creating Categories for Action Items
Categories will be set up for you during implementation. Use Categories to order the Action Items displayed on a Family’s PWS web page. Categories are assigned to items on the Process Status Items tab.
- In PWS: Sources Main > Notifications tab, select the Categories subtab.
- Click Download to bring in the most current Categories settings from your PWS web site.

- Review and edit your Categories:
- Categories will appear on the web site according to the Sort order. The Application should be Category Sort item number 1.
- Each Category has a Name and a Description.
- The Description will appear beneath the name on the web site. Use this for simple instructions.
- To Delete a category, click the red X at the right of the record.
- To Add a new category, enter it into the last row.
- Click Upload to save your changes to the web site.