At the end of each admission season, you will need to prepare PORTAL for the next season. These procedures are generally not done until right before the new school year begins. Rolling forward too early when you are still processing Inquiries for next YOE will result in incorrect reports on re-enrollment numbers.
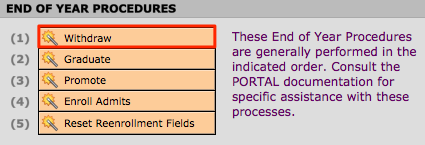
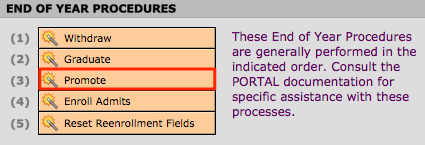
These procedures must be done all at one sitting and in the order specified:
- Graduate the graduates.
- Withdraw the transferring students.
- Promote the remaining Enrolled students to the next grade.
- Enroll the fall admits that have been accumulating.
- Reset the Reenrollment fields.
- Archive last year’s records.
- Set as Active records for the next YOE for those who may be rolling for the upcoming academic year.
- Roll the Preference settings forward to new admission season, YOE and academic year.
Written directions follow. If you prefer to watch a video, see the webinar at the end of this article.
You will use buttons found on the Enrollment tab to perform EOY procedures.
Processing Graduating students
At the conclusion of a school year, a group of students will need to be designated as Graduates and removed from the enrolled student body. Depending on your school, this may be at the 8th grade, the 12th grade or some other grade.
The Graduate button and script
- Navigate to INQUIRIES > Enrollment.
- Find the group of students that are graduating by performing a find on the Current GD in the This Year area of the screen. Enter the grade from which students are graduating and perform your Find.
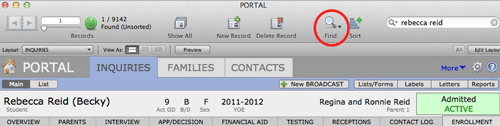
- Click the orange Graduate button located under End of Year Procedures.
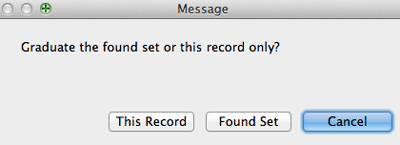
- A dialog box will open asking you whether you want to graduate the found set or only one record; make your selection.

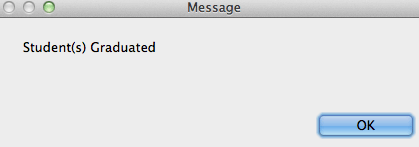
- If all records were successfully graduated a dialog box will open telling you such. Click the OK button to continue.
- If a record or records could not be graduated an error message will open. The Graduate Script will operate only on records where the Registrar Action is Enroll.
- Click the OK button to continue. The graduated students will appear in a list on the Enrollment Details screen.
- Click Done to exit Enrollment Details.
The Graduate Script will change the following fields:
- Registrar Action to Graduate
- Enrollment Type is cleared
- Exit Date to the current date
- Exit Year is set to the current academic year
- W/D reason is set to Graduate
- Exit GD is set to the current grade
- Current GD is cleared
- New checkbox is unchecked
- The Adm/EnrStatus will change to Graduated
The Graduate Script will also set the following calculated fields to blank: Current GD, Enroll GD, Enroll Div, Rising GD, Rising B/D, ReEnr GD, ReEnr Div, Enrolling Next Year.
Withdrawing Transferring students
During a given school year, students may leave the school for a variety of reasons. You would have dealt with those students at the time of their withdrawal. For students who finished the last academic year but who are not returning for the next for whatever reason need to be transfered or withdrawn from the school during the end of year proceedures.
- In the Quickfinds area of the Enrollment tab, find the group of students that you wish to withdraw by clicking the Transfering button.
![]()
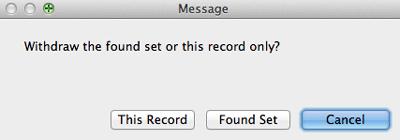
- Click the orange Withdraw button in the End of Year Procedures area of the screen.
- A dialog box will open asking you whether you want to withdraw the found set or only one record; make your selection.
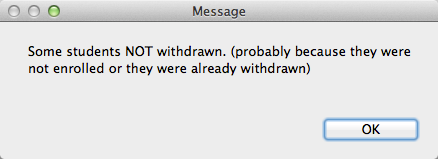
- If a record could not be withdrawn you will see an error message. The Withdraw Script will work only on records where the Registrar Action is Enroll. Click the OK button to continue. Verify that all records in your found set have been withdrawn.
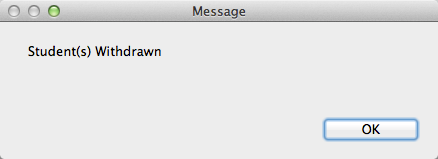
- A message will verify if all records were withdrawn successfully. Click the OK button to continue.
The Withdraw Script will change the following fields:
- Registrar Action is set to Withdraw
- Enrollment Type is cleared
- Leave Date is set to the current date
- Exit Year is set to the current academic year
- Exit GD is set to the current grade
- Current GD is cleared
- The AE Status is changed to Withdrawn
The Withdraw Script will also set the following calculated fields to blank: Current GD, Enroll GD, Enroll Div, Rising GD, Rising B/D, ReEnr GD, ReEnr Div, and Enrolling Next Year.
After completing the Withdraw Script, you may want to specify the reason for withdrawal. This can be done on a record-by-record basis by selecting a reason from the pull-down menu or by typing directly into the W/D reason field on the Enrollment screen. The reason can also be entered with a global replace on the found set.

Promoting returning students
After the year is over and the current graduates and the students who are not returning have been processed, the remaining enrolled students must be promoted to the next grade. This process will replace their Current GD with their Rising GD. This Rising GD takes into account their Promotion Type—Normal, Repeat, Double-Promote.
The Promote button and script
The Promotion Script will operate only on a record that has a Registrar Action of Enroll and whose Next Year Status is Returning.
- Navigate to INQUIRIES > Enrollment.
- Find the group of students that are to be promoted by clicking the Enrolled Students quickfind button.

- Click the orange Promote button located under End of Year Procedures.
- A dialog box will open asking you whether you want to promote the found set or only one record; make your selection.

- If all records were successfully promoted a dialog box will open telling you such. Click OK to continue.
- If a record or records could not be promoted an error message will open.
- Click OK.

The Promote Script will operate only on records where the Registrar Action is Enroll and the Enrolling Next Year checkbox is checked.
The Promote Script will change the following fields:
- Current GD to the rising grade
- Promotion Type is cleared
- Promotion Date is set to the current date
- New checkbox is unchecked
The following calculated fields will be recalculated: Enroll GD, Enroll Div, Rising GD, Rising B/D, ReEnr GD, ReEnr Div.
Enrolling admits
Next you need to Enroll the new students.
- Navigate to the Enrollment tab.
- Perform a find for the current admits by clicking the New Admits quickfind button.

- Click the Enroll Admits button.

- A dialog box will open asking if you want to enroll the record you are in or the found set. Click Found Set.
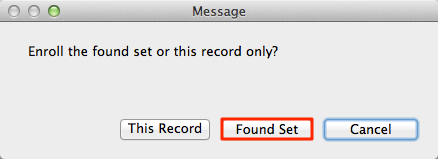
The Enroll Admits script changes the status from Admitted to Enrolled in records that have a status of Admitted.
Resetting the Reenrollment Fields
Once you have completed the above procedures you want to reset all the re-enrollment fields for the next year. This can take some time so ensure that you have 15 to 30 minutes depending on the size of your student body. This process cannot be interrupted.
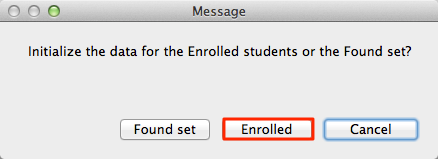
- Click the button Reset Reenrollment Fields.

- A dialog box will open to confirm that you want to initialize the data. Click Enrolled. This will reset the reenrollment fields for all enrolled students.
Archiving last year’s records
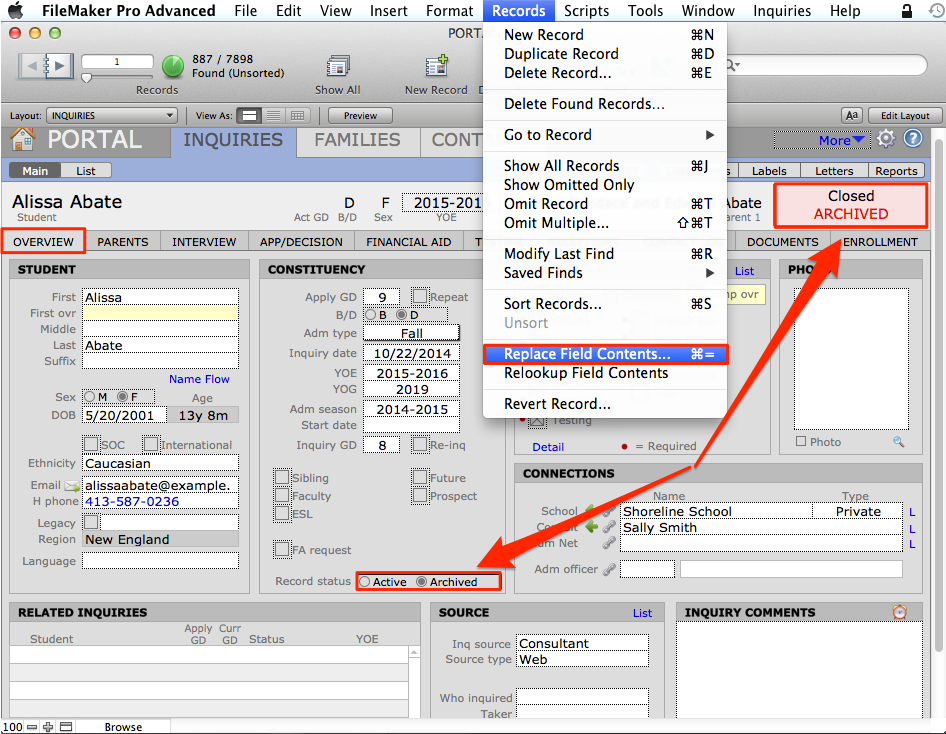
- Perform a find for Active records using the Record Status field on the Overview tab.
- On the Overview tab of the first record in your Found Set, click the radio button Archived, changing the Status from Active to Archived.
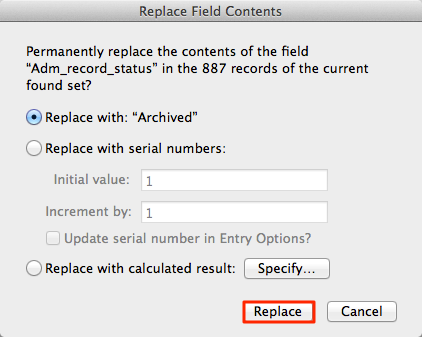
- Select Replace Field Contents in the FileMaker Records menu.
- A dialog box will open asking if you would like to replace the field contents for the found set. This is a permanant change and cannot be undone. If the field is Adm_record_status is displayed and number of records cited for the found set is correct, click Replace. If not, cancel and ensure your cursor is sitting in the field Record Status.
Set as Active next season’s records
- Navigate to lists/forms and select the YOE/Adm Season list. Perform a find for the upcoming YOE that you will work to fill in the upcoming admission season. For example, if it is August 2015 the next YOE is 2016-2017.
This will display anyone who indicated they wanted to attend in that particular YOE. Among these may be Futures. You do not want to make Futures Active. Futures always remain Archived. Instead we will omit them from this Found Set.
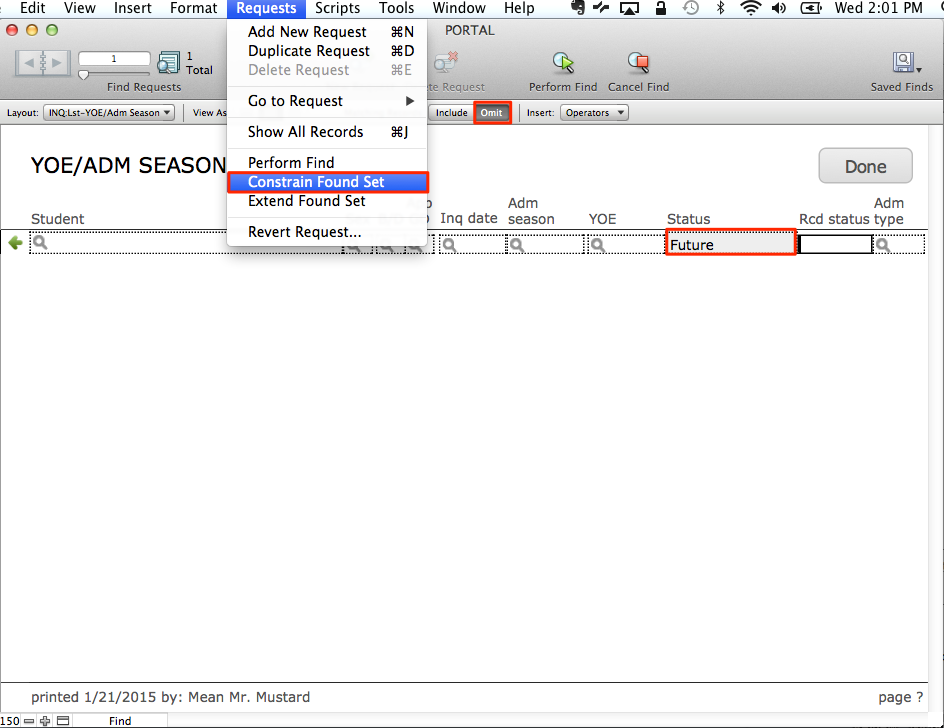
- Enter Find Mode and enter Future into the Status field.
- From the Status area above, click the Omit button.
- From the Requests menu above, select Constrain Found Set.
You will be left with all those children inquiring for the upcoming YOE, but not the Futures.
- Navigate to Inquiries, Main view, Overview tab.
- Activate the records in the found set by clicking the radio button Active in one record and Replace Field Contents.
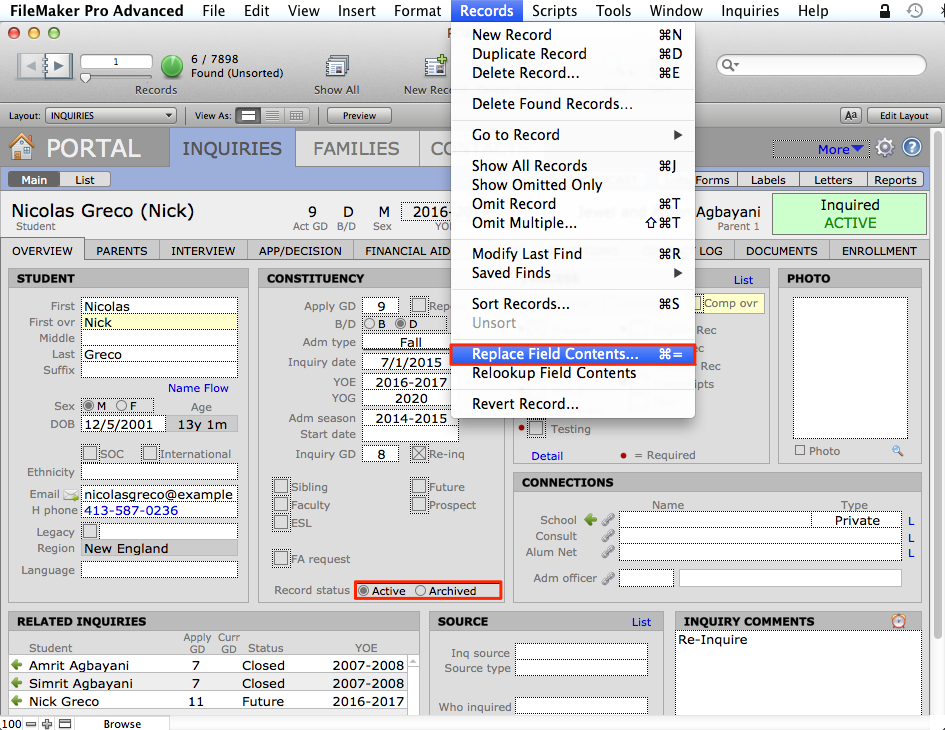
- A dialog box will open asking if you would like to permanently replace the field contents. If the number of records cited for the found set is correct, click Replace.

Rolling preference settings forward
- Click the gear icon to enter PORTAL Preferences.
![]()
- Update the current admission season.
- Update the current academic year.
- Update the current entry year.
Remember that the current academic year will be the same as the the current admissions season. The current entry year will be one quad ahead. For example, if the current or (upcoming) academic year is 2015-2016, that will also be the current admission season. The current entry year will be 2016-2017.

- In order for changes in PORTAL Preferences to display you must quit PORTAL and reopen it.