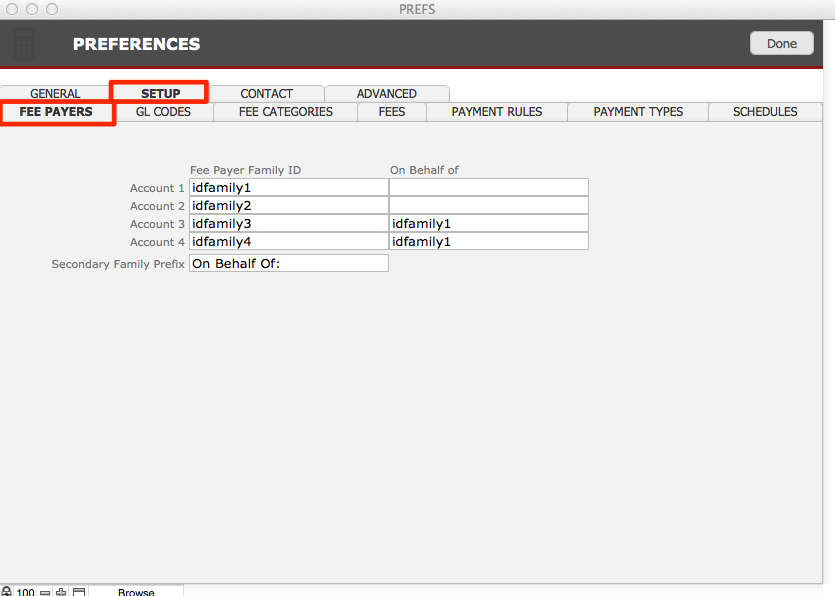
Fee Payers
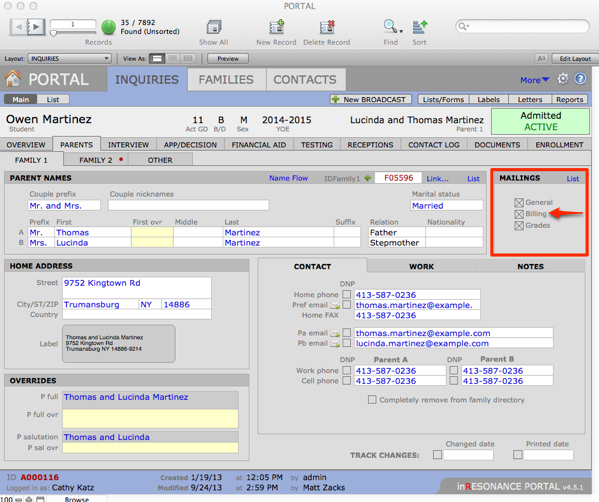
Your implementor will make sure these details are properly defined in Prefs. Fee Payers are designated in PORTAL Inquiries > Families tabs, or in PORTAL and SANDBOX Families—see the Mailings area, the Billing checkbox. Student Billing can designate fee payers differently by activating accounts and assigning payment rules accordingly.
GL Codes
GL Codes will be set up during implementation. Implementaion of Student Billing requires that you create a new GL Code in your accounting system. It will be named “Student Billing AR”, the type will be “Other Current Asset” and the GL Code number of your choice. We will enter this into Student Billing.
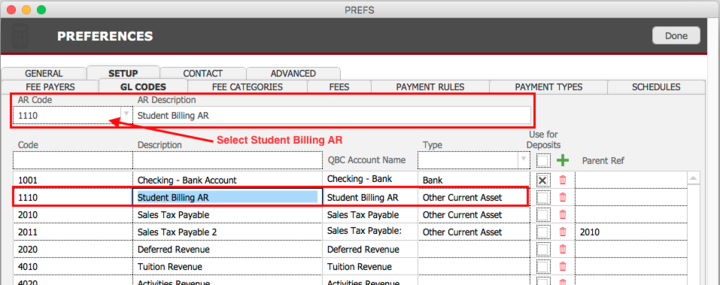
You can enter additional GL Codes using the blank fields at the top of the list on the GL Codes subtab of Preferences > Setup tab:
- Add the number of the code into the Code field.
- Add a simple description of the code in the Description field that identically matches the words for the GL Code in your accounting system.

- Select a GL Type from the Type drop down.
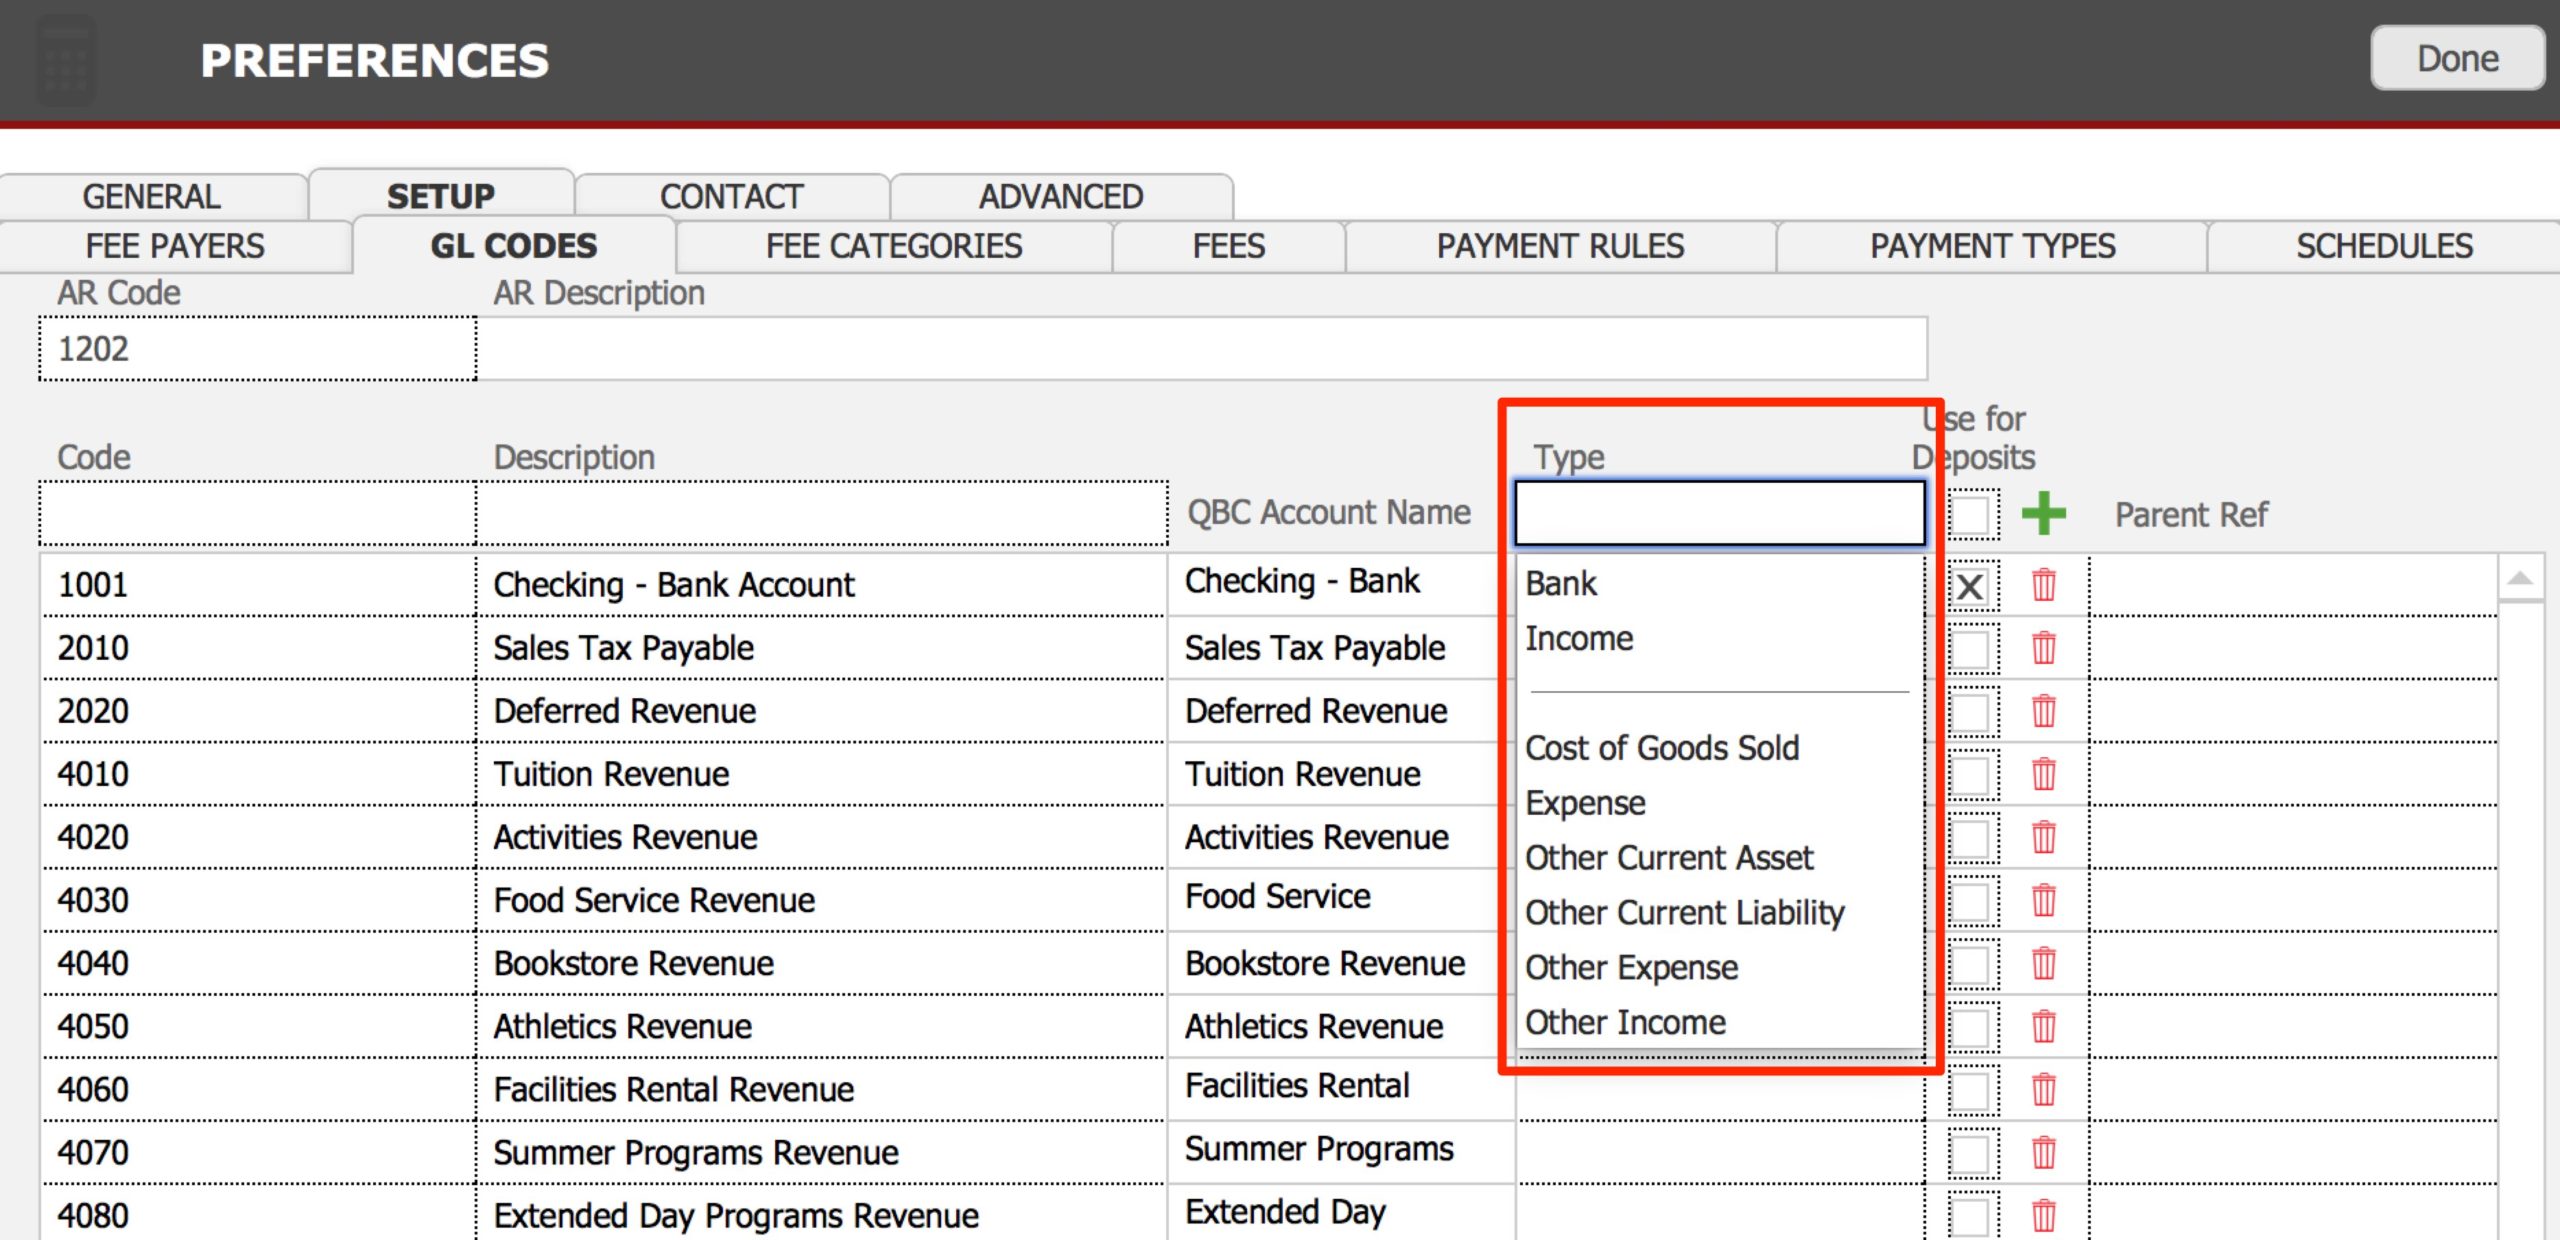
- Click the green plus icon to add the new code to the list.
- Click Done.
Fee Categories
Fees can be grouped into Fee Categories, and categories can be designated as:
- Fees in this category can be charged only once per year
- Fees in this category can be scheduled (that is, apportioned to be paid according to a set schedule)
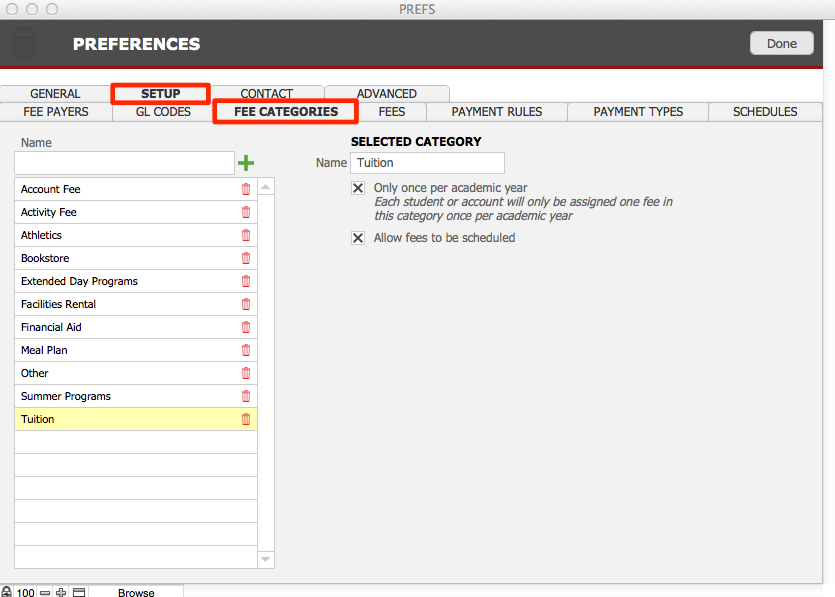
- Click on a Fee Category from the list and see that it can be edited in the Selected Category area on the right.
- Add the Name for a new category in the blank field above the list and click the green plus sign to add it to the list of categories.
- Delete a category by clicking the red trash can icon related to it.
Fees
Fees are set up to include the following information:
- Fee Name
- Code: Whether the fee is taxable
- Category associated with the fee
- If this fee is billed to a Student or to an Account (an Account Fee will be charged to the account only once, no matter how many students are associated with the account)
- Pretax Amount of this fee (for variable fees, such as Bookstore or Financial Aid, enter a placeholder amount that you can then adjust when you prepare invoices). Tax associated with this fee, as a %. The tax amount and total amount will autofill.
- GL Code(s) associated with the fee
- Allocation by % of pretax amount to associated GL Code(s)
- If this fee is to be charged only once per year, or if it can be charged multiple times (such as a bookstore fee)
- Payment Allocation Priority: designate the hierarchy of fees to be paid when allocating payments.
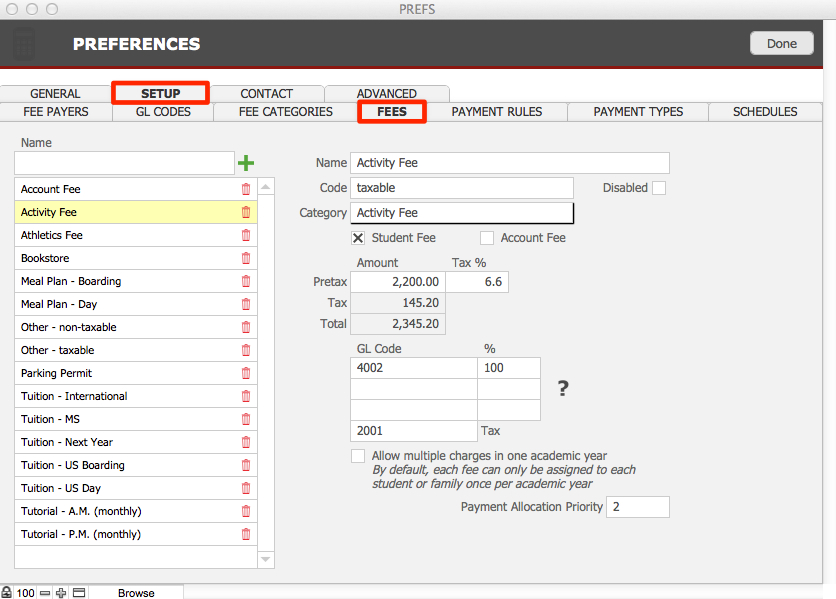
- Click on a fee in the list on the left to see the details of that fee.
- Add a new fee using the Name field at the top of the list and click the green plus icon to add the new fee to the list.
- Enter the details of the fee.
- Allocation by GL Code assumes 100% of the pre-tax amount will be allocated to the main GL code assigned to the fee. If this fee is to be split among GL codes, enter the codes and the associated percentage to be allocated to each.
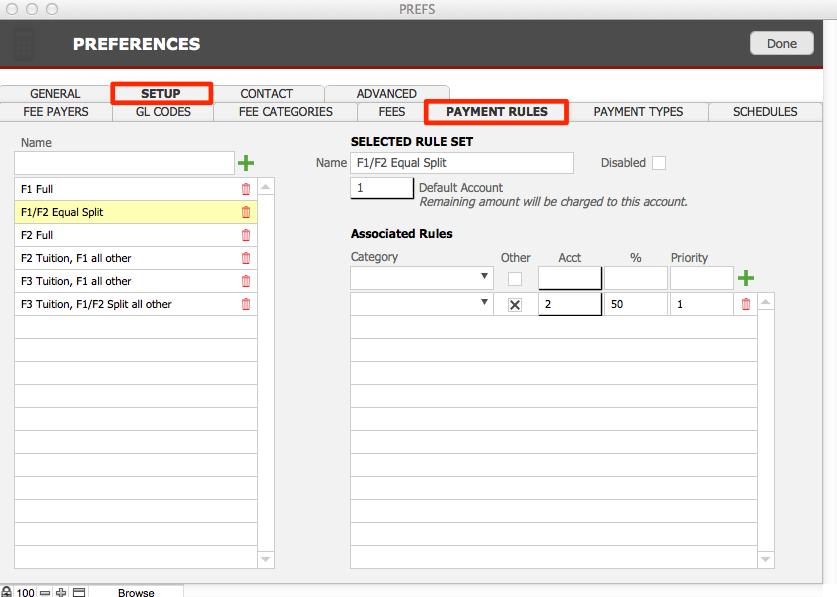
Payment Rules
Student Billing offers complete flexibility in setting up a list of payment arrangements that can be assigned to the billing accounts related to your students.
Payment Rules are assigned according to the fee payers identified and marked in your core solution for each student. For most students, Family 1 (F1) will be the responsible party. In some cases (for instance, in the case that parents are divorced), Family 1 may pay tuition and Family 2 (F2) will pay fees; or perhaps both Family 1 and Family 2 will split all costs 50%-50%; one party may have a Limit (Family 2 agrees to pay 50% of all charges up to a limit of $15,000). In some instances, Family 3 (F3) (perhaps a grandparent or a sponsor) will pay a certain portion of tuition and fees. Your Payment Rules will cover all contingencies that will arise for your students.
If a charge is entered that is not specifically covered by the assigned Payment Rule, the charge will default to Family 1 (F1 Full, in this example).
- Select a Rule Set, or create a New Rule Set.
- Name of the Rule Set will display on drop-down menus and should be self-explanatory.
- Default Rule Set defines which Fee Payer (1, 2, 3, or 4) will be charged if the rules do not cover a particular charge.
- Selected Rule Set will define how any given fee will be assigned:
- Name should combine the assigned Fee Payer and a short description
- Default Account is selected from a drop-down menu that has been defined on the the Fee Payers subtab. This account will be charged unless otherwise specified.
- Fee Category is selected from a drop-down menu that has been defined on the Fee Categories subtab.
- The Other checkbox is checked for any fee categories that do not have a rule. In the case illustrated below, no categories are specified, so all will be split 50-50.
- Acct. is the responsible Fee Payer, selected from a drop-down menu that has been defined on the the Fee Payers subtab. Different categories can be assigned to different Fee Payer accounts (1, 2, 3, 4).
- % is the portion of the Fee that will be charged to the Fee Payer Account.
- Limit is the maximum amount that will be charged to a particular Fee Payer for that Fee Category. Once the Limit has been reached, any remaining fees to be paid in that category will be assigned to the Default Account.
- Priority defines the hierarchy of fees.
- Any fee not specified here will be assigned to the Default.
Here is an example of a Payment Rule where Family1 and Family2 will split all charges 50-50:
and here is a more complex Payment Rule, where a third party is paying tuition, and Family1 and Family2 split all other fees:

Disabling a Payment Rule
You can disable any payment rule by clicking the Disabled checkbox within the Payment Rule Sets Setup. We recommend that you never disable any Payment rule that is in use by any account.
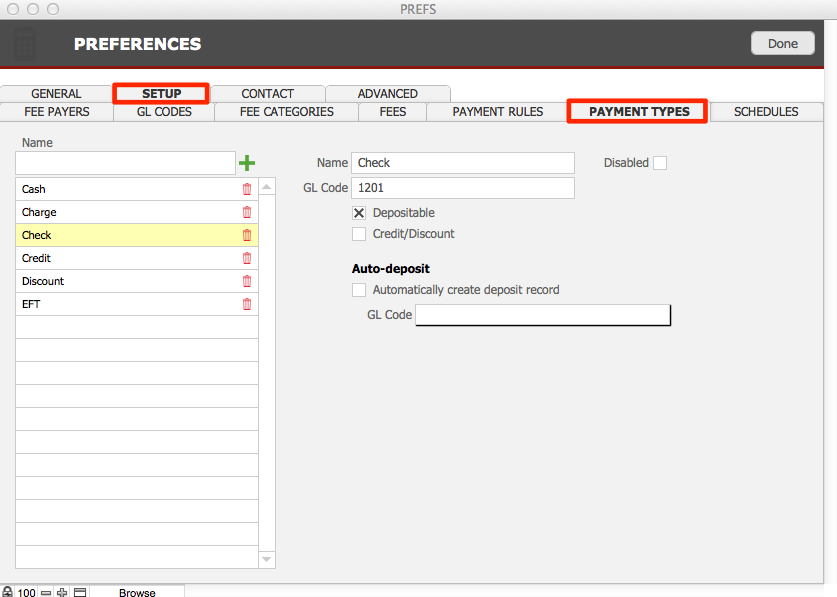
Payment Types
This will be setup during implementation.
- Click on a payment type in the list on the left to see the details of that type.
- Add a new payment type using the Name field at the top of the list and click the green plus icon to add the new type to the list.
- Enter the details of the payment type.
- Check any appropriate checkbox for this type.
- If this payment type will be automatically deposited, check Auto-deposit and enter the GL Code where the payment should be deposited. It is rare when one would set a payment type to be auto-deposited.
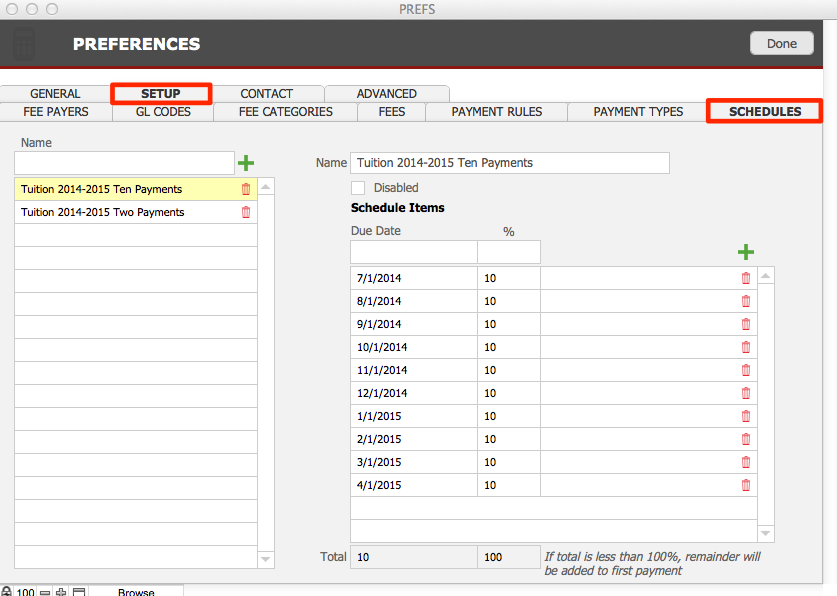
Schedules
This is where you setup Payment Schedules that can be applied to an invoice after the invoice has been created. Usually, schools will schedule only a Tuition fee. The fee must be marked as schedulable for a payment schedule to apply.
To add a new payment schedule (e.g. you may add a new schedule for a student enrolling mid-year):
- Add a new schedule using the Name field at the top of the list and click the green plus icon to add the new schedule to the list.
- Enter the details of the schedule, by entering a due date and the % of the fee to be paid on that date. Click the green plus sign to add this date to the schedule below.
- Delete a date line from the schedule by clicking on the red trash can icon associated with the date.
- Repeat until your new schedule is complete.
- Click Done.