AM 1 Faculty Guide
The TEACHER ACCESS MODULE (TAM 1) provides an intuitive interface for faculty members to view their students’ and advisees’ biographical information as well as manage their students’ grades, comments and attendance. Additionally, faculty can track interactions with students and advisees via the Contact Log.
Logging Into TAM 1
- Open FileMaker Pro on your desktop.
- From the File menu, select Open Remote.
- Connect to the FileMaker Server and the TEACHER ACCESS file. Your FileMaker Server administrator will provide you with details on how to connect.
- Click Open.
- You will be presented with an authentication dialog box. Enter your User name and Password (provided by your FileMaker Server administrator) then click Login to continue.

Getting Started
When you first log into TAM, you are presented with the Dashboard. There are a total of four screens—Dashboard, Students, Attendance and Grade Entry—where you will do your work:
- The Dashboard allows you to view your scheduled classes, see a list of your advisees, view or print your graphic schedule, and change your TAM password.
- From Students you are able to view a list of your students, view biographical information about individual students and their family or families, view classes, grades, comments and attendance incidents for individual students, and record contacts with individual students.
- Attendance allows you to record attendance incidents for your students.
- Grade Entry allows you to enter grades and comments for your students.
Each of these are discussed in detail in this chapter.
Dashboard
When you first access TAM, the Dashboard displays a list of your classes on the top right with a list of your advisees below.

Changing Your Password
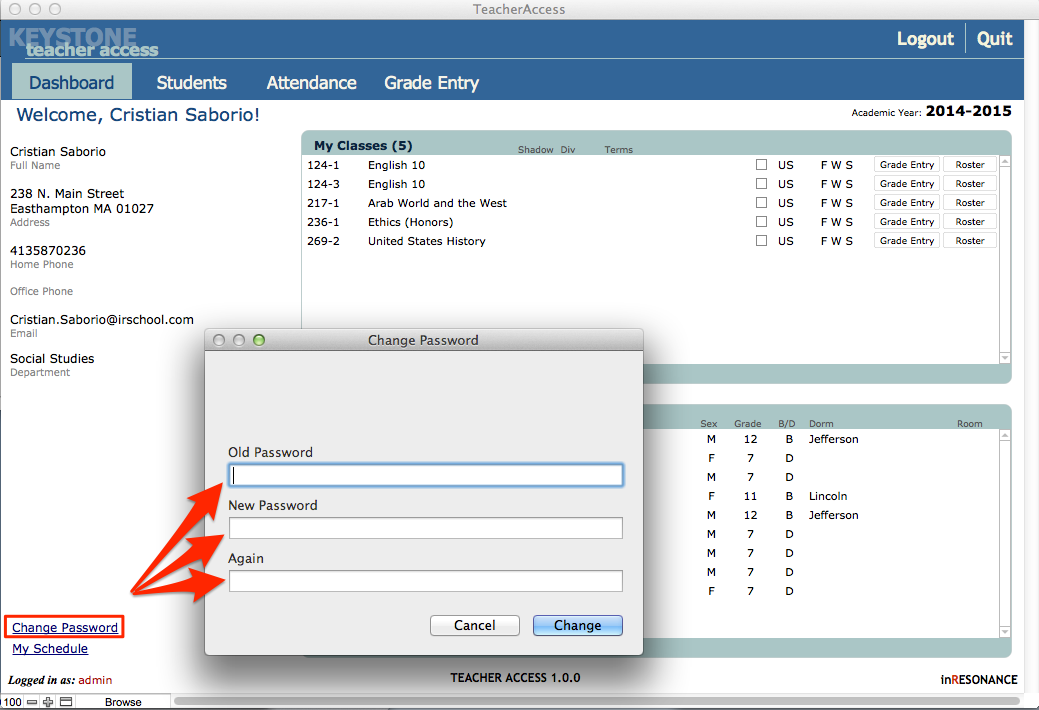
- From the Dashboard click on the blue text located at the bottom left labeled Change Password.
- In the dialog box, enter your old password and new password in the appropriate fields.
- Enter your new password again in the Again field.
- Click Change to change your password or click Cancel to return to the Dashboard, leaving your original password unchanged.
Viewing/Printing Your Graphic Schedule
- From the Dashboard, click on the blue text located on the bottom left labeled My Schedule. Your graphic schedule will open in a separate window.

- Choose Print from the FMP File menu.
- To return to the Dashboard, close the schedule window as you would close any window on your computer.
Viewing and Printing Class Rosters
- Click the Roster button next to the corresponding class, listed under My Classes. The class roster you selected will open in a separate window.
- From the FMP File menu, select Print.
- To return to the Dashboard, click the Continue button to the left of your Roster.
Viewing Advisees Biographical Information
- To view biographical information or family information for any of your advisees, click on his or her name in the list from the My Advisees list on the Dashboard.
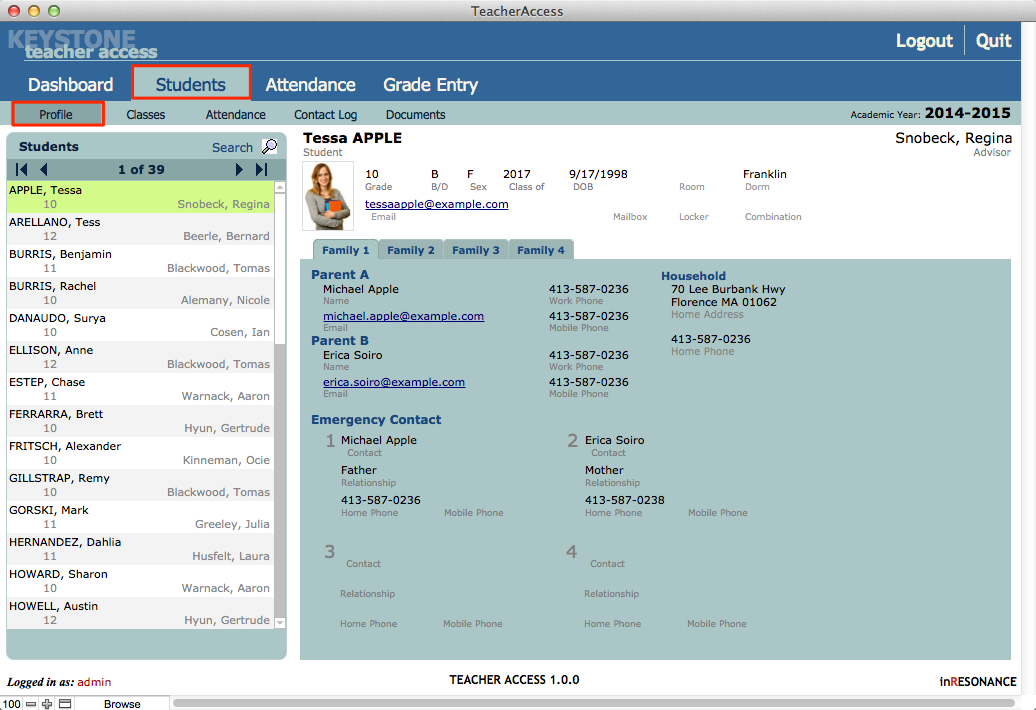
- Use the scroll bar on the right to scroll through the entire list if necessary. The student’s basic enrollment information will be displayed on the top right with tabs for family information below. If the student has more than one family household, you can view that information by clicking on the appropriate Family sub tab.
- Click on the Dashboard tab to return to the Dashboard.
Viewing Student Information
Students allows you to view biographical information for each of your students and advisees, see what classes they are enrolled in for the current term, view attendance incidents, and record contacts made with them. Students is divided into four sub tabs: Profile, Classes, Attendance, and Contact Log to help make managing students easier for you.

Searching for Students
When you first click the Students tab you are presented with a screen that allows you to search for individual students by name or grade. Additionally, you can view a list of all the students you teach for the current term or all of your advisees.
When you first click the Students tab you are presented with the Search screen. You can return to this screen any time by clicking the Search icon.

To search by a student’s name:
- If the Search field is not available, click the Search icon.
- Enter the full or partial name of the student in the Search field.
- Select the Name radio button and click the Search icon. You will see a list of all students with that name in the Search Results window on the right.
- Select the desired student by clicking on his or her name.
The Students > Profile screen will appear. To search for a new student, click the Search icon.
To search by a particular grade:
- Click the Search icon if you are not on the Search screen.
- Enter the grade of the student(s) in the Search field.
- Select the Grade radio button and click the Search icon. A list of all students in that grade will appear in the Search Results window on the right.
- Select the desired student by clicking on his or her name.
The Students > Profile screen will appear. To search for a new student, click the Search icon.
To display a list of all your students for the current term:
- Click the Search icon if you are not on the Search screen.
- Click the Show My Students link. A list of all your students will appear in the Search Results window on the right.
- Select the desired student by clicking on his or her name.
To search for a new student, click the Search icon.
To display a list of all your advisees for the current term:
- Click the Search icon.
- Click Show My Advisees link. link on the Dashboard. A list of all your advisees will appear in the Search Results window on the right.
- Select the desired student by clicking on his or her name.
To search for a new student, click the Search icon.
Viewing Student Profiles
To view a student’s biographical information, find the desired student as described in the previous section. Select the student from the list on the right hand side of the screen.
The Profile screen (Students > Profile) will appear. The selected student will be highlighted in yellow within the list on the left, and the student/family information will be displayed on the right. A student can be related to up to four different households or families.
- To view household information, click on the appropriate Family sub tab. If there is only one household for this child, the other Family screens will be blank.
To search for a new student, click on the Search icon above the student list.
Viewing Students’ Classes, Grades and Comments
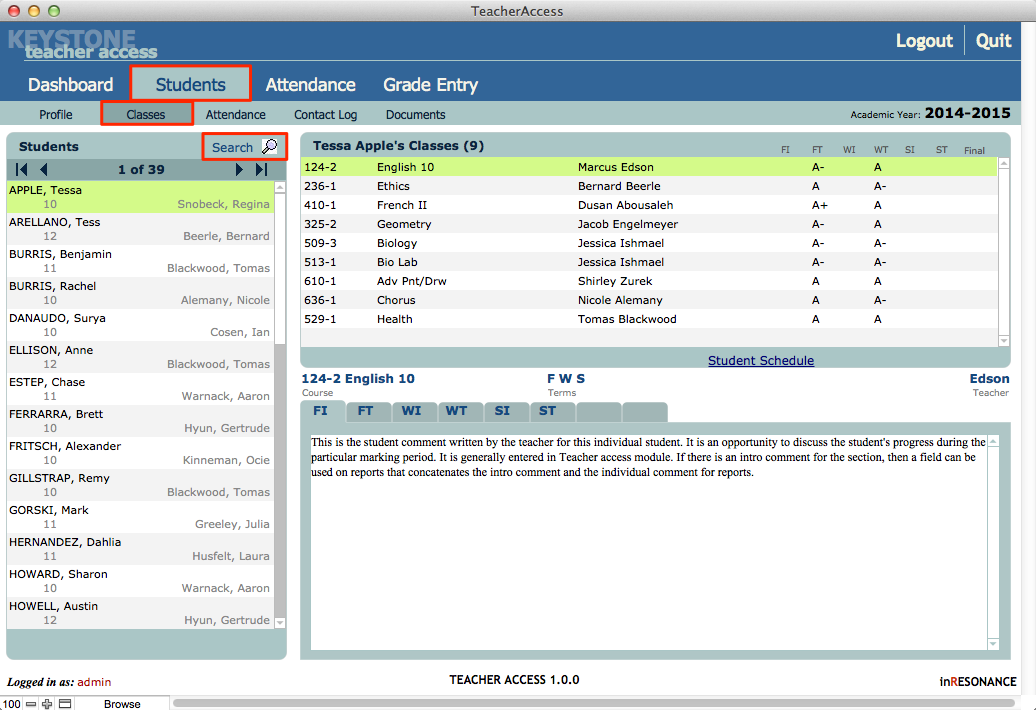
The Classes screen (Students > Classes) allows you to view your students’ and advisees’ grades and comments for all classes for which they are enrolled in the current academic year. You cannot enter grades or comments from this screen.
- To view a specific student’s grade and comment information, click the Classes sub tab.
- Search for the student by clicking the Search icon on the right.
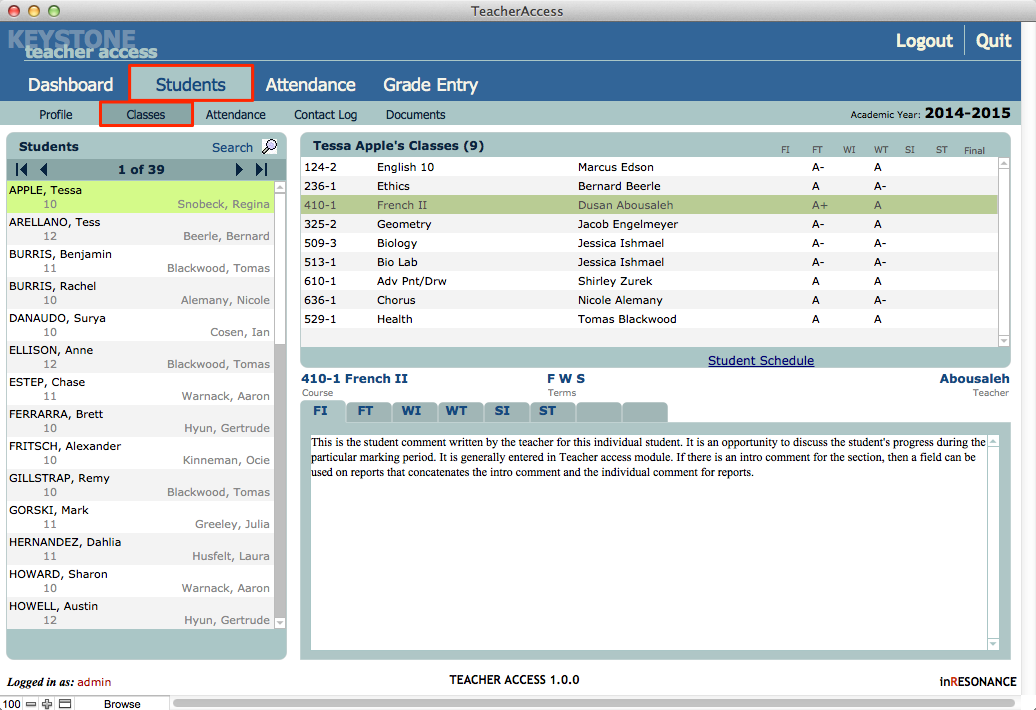
- Select the student from the list on the right. When selected, his or her name will be highlighted in yellow. The student’s classes will appear on the top right of the screen.
- Click the desired class from the list.
- Click the desired term tab below to view grades and comment information.
Viewing Attendance
The Attendance screen (Students > Attendance) displays all attendance incidents for a particular student in the current academic year. It does not allow entry of attendance incidents.
- Click the Attendance sub tab.
- Find the student for whom you wish to view attendance incidents.
Attendance incidents will appear in the window on the right.
Contact Log
Interactions with individual students can be recorded on the Contract Log screen.
- Find the student for whom you wish to view or enter contact items.
- Select the student’s name from the list on the left. All of the selected student’s Contact items will appear to the right.
To create a new Contact Log item:
- Find the desired student and select his or her name from the list on the left.
- Click the New Item button. The New Item window will be displayed.
- Enter the Type, Date, Time and any Notes you wish to record.
- Click OK to add the Contact item. Click Cancel to close the window. The item will not be added.
- To delete an item once you have created it, click the Trash can icon to the right of the item. A dialog box will appear asking if you wish to delete the item.
- Click Delete if you do, or Cancel if not.
Taking Attendance
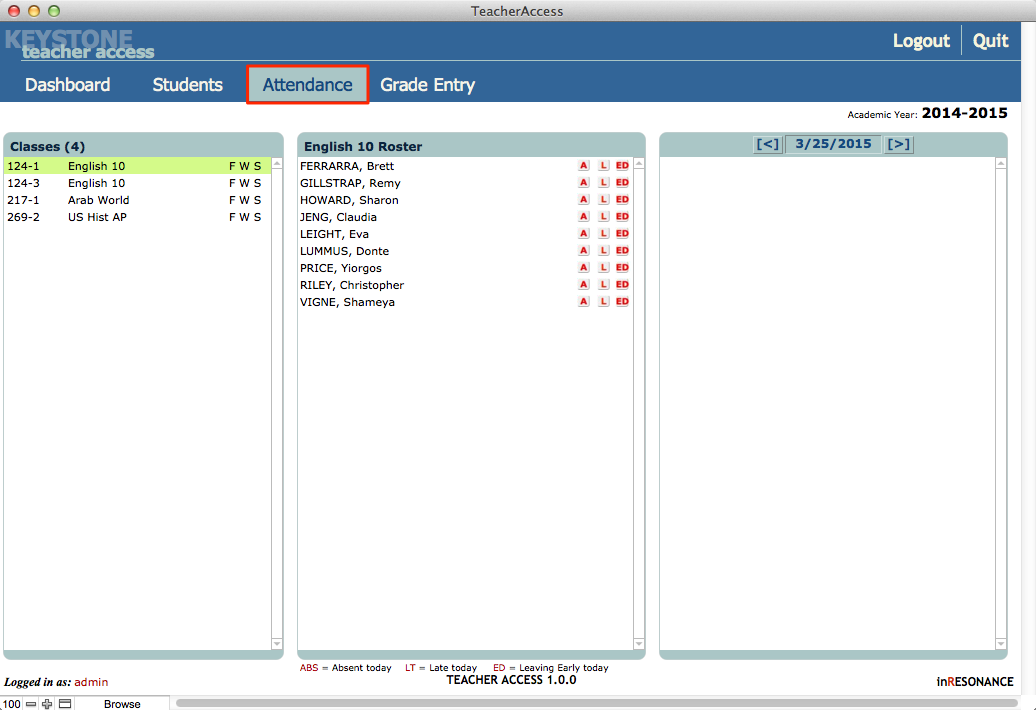
The Attendance tab allows you to take attendance for all your scheduled classes for the current term.
✢ NOTE The Attendance screen is often customized to suit individual school needs. The instructions here are for the default configurations. Consult your Registrar or your database administrator for taking attendance.
To create attendance incidents for today:
- Click the Attendance tab. A list of all your classes will appear on the left.
- Select the class for which you want to record attendance incidents by clicking on the class name.
- A list of students enrolled in the selected class will appear under Roster.
- Click the appropriate A (Absent) or L (Late) buttons to the right of a student’s name.
To create previous or future attendance records:
- Select a date by using the forward or back arrow buttons above the list on the far right.
To delete an incident:
- Click the red Delete icon next to the item on the right.
To delete an past or incorrect incident:
- Navigate to the Incidents table.

- Find and select the record(s) you wish to delete.

- Choose Delete Record from the Records menu.
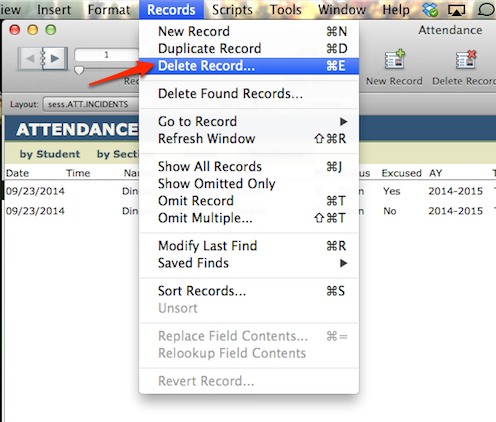 Note: Be careful to select Delete Record and NOT Delete All Records.
 - Click Done.
Grades and Comments
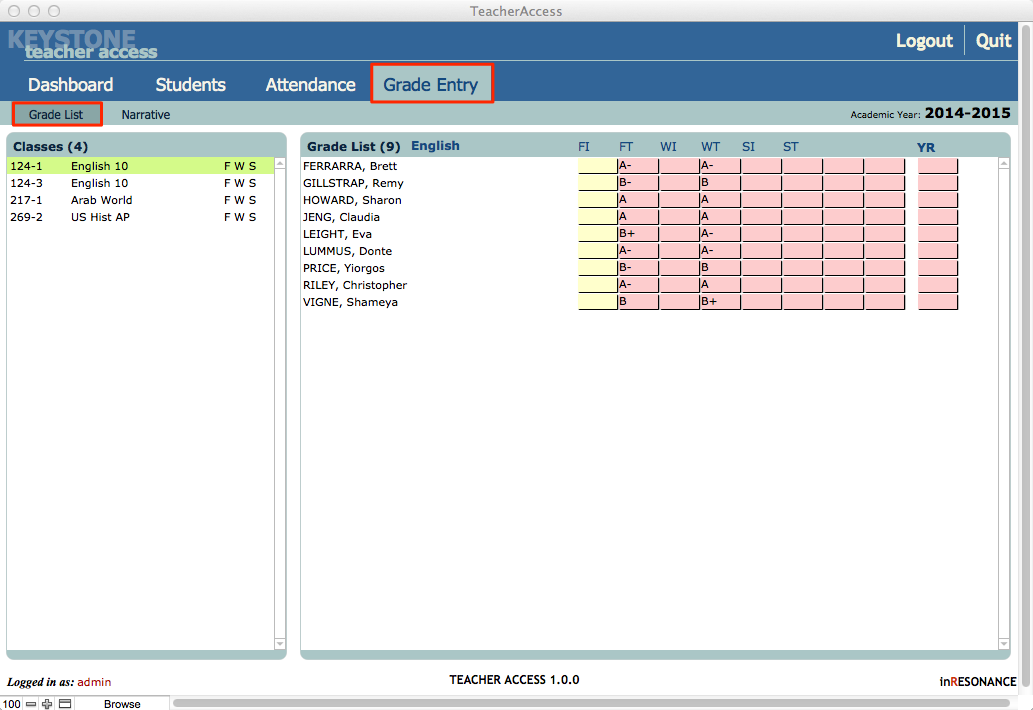
The Grade Entry screen allows you to enter term-end marks and comments for students currently enrolled in your classes. Individual grades are entered from the Grade List sub tab. Narrative comments are entered from the Narrative sub tab.
Entering Grades
To enter grades for students:
- Click the Grades Entry tab.
- Click the Grade List sub tab if it is not already chosen. A list of classes you teach will appear on the left.
- Select the class from the list for which you wish to enter grades. The selected class will appear highlighted in yellow and students enrolled in that class will appear on the left.
- Click under the appropriate term label for the student you wish to record a grade. A list of possible grades will appear.
- Select the grade from the drop down list.
- Continue until you have entered all desired grades for your students.
- Select a different class to enter grades from the list on the left.
To delete a grade:
- Click into the field with the grade you wish to delete. The drop down list will appear. Click again in that same field to hide the list, then delete the grade using your Delete key.
Recording Narrative Comments
Narrative comments, introductory paragraphs, letter marks, and exam scores can be entered from the Narrative sub tab.
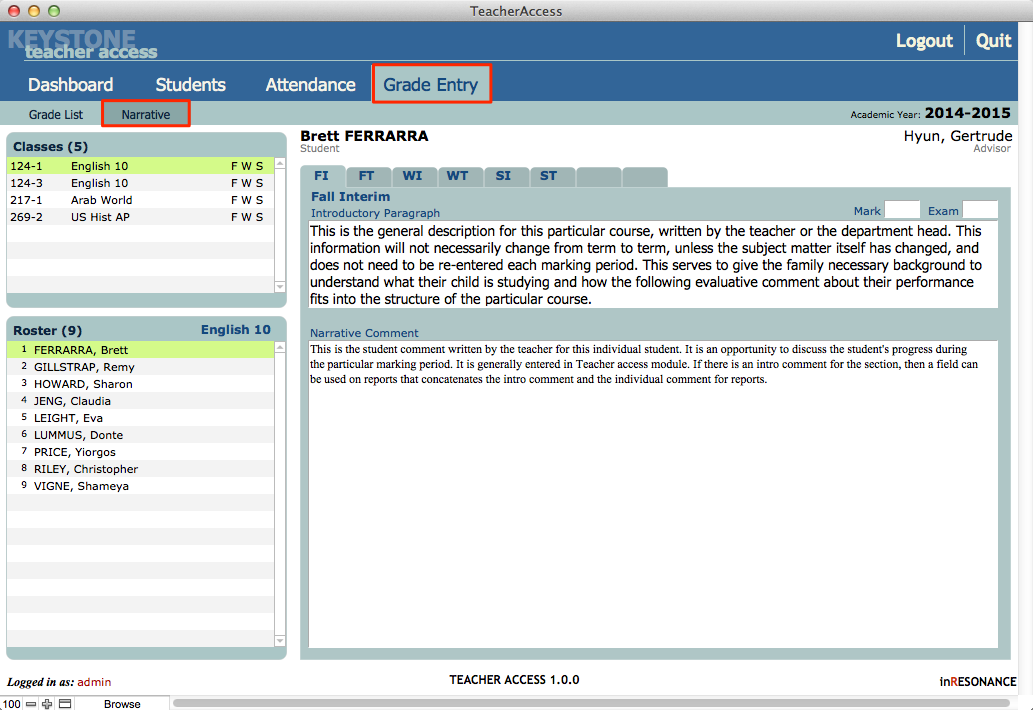
- Navigate to Grade Entry then click the Narrative sub tab. A list of your classes will appear on the top left.
- Select the desired class by clicking on it. A list of students enrolled in that class will appear below.
- Select the desired student. His or her name will be highlighted in yellow and his or her name will appear on the screen to the right. Ensure you have selected the correct student.
- Select the tab labeled with the appropriate term on the right below the student’s name.
- Type an Introductory Paragraph if you have not done so already. This paragraph will appear on the grade report for all students in the selected class. You need to type it only once.
- Type the narrative comment for the selected student in the Narrative comment field below.
You may also enter letter marks and exam grades from this interface.
Exiting Teacher Access Module
- To log out of TAM, click the Logout button at the top right corner of any screen. This will return you to the Login screen and leave the FileMaker Pro application running.
- To exit TAM and quit FileMaker Pro, click the button labeled Quit at the top right corner of any screen.
Additional Questions
If you have any additional questions, please consult with your school Registrar or database administrator.

