inRESONANCE products are certified for FileMaker 19.6. DO NOT upgrade to FileMaker 2023 until we have a new iRLOCKFILE, scheduled to be released in July.
If you are currently on FileMaker 19.5 and you want to upgrade to 19.6, all you will need is a new iRLOCKFILE.
If you are on an earlier version than 19.5 and you want to upgrade to 19.6, you will need to get a copy of the newest iRLOCKFILE and iRWEBENGINE before you upgrade.
Please email [email protected] to get your iR files.
iR Server Support
To receive our assistance during your upgrade, send email to [email protected]. We can meet with you for a server pre- and post-check to make sure you have everything set up correctly.
inRESONANCE Solution Incompatibilities with FileMaker 19
- ptCalendar – Version 2 needs a patch before being used in FileMaker 19 due to the Seedcode plugin changes. This patch need to be scheduled PRIOR to your migration to FileMaker 19. It will require a data freeze. To determine your version of PORTAL Calendar, open Calendar from the More Menu drop-down in PORTAL. The Calendar version is located in the upper left of the main calendar layout. Also, if you have done any FileMaker customizations to your Calendar 2 files, please let support know as you request the new files.
- GWS – onlineGN – the web module for Generations, will need a free patch to be usable on Windows 10.
- Keystone – Versions older than 4.1.5 may encounter an error when using Batch Add due to the plugin. We can provide a patch.
- Your version of PORTAL Web Services (PWS) or SANDBOX Web Services (SBWS) needs to be version 3.4.2 or later. To determine your version, open PWS/SBWS and look for the version number in the lower left corner. If you have 3.4.1 or less, please contact [email protected] so you can get your free PWS/SBWS upgrade.
Hardware and System Requirements for FileMaker Server 19
- We recommend that your FileMaker Server has at least 4 processor cores, and 16+ GB of RAM.
- FileMaker Server needs 65% free space on the disk for its own caching. Calculate the backup size and your OS, etc.The Dashboard of the FileMaker Admin Console will tell you the free disk space percentage.
- Mac OS:
Do not use TimeMachine as a backup for Mac servers. It has been known to consume all space available on the server. We recommend using a different backup method. You may need to issue these commands to stop and start the server throughout the upgrade process:
Start FileMaker Server processes: sudo launchctl start com.filemaker.fms
Stop FileMaker Server processes: sudo launchctl stop com.filemaker.fms
FileMaker Resources
- FileMaker Server Operating System Requirements – all versions:
https://support.claris.com/s/article/FileMaker-Server-operating-system-requirements-all-versions-1503692927810?language=en_US - FileMaker Server 19 Configuration Guide:
https://help.claris.com/en/server-installation-configuration-guide/ - FileMaker 19 Technical-Specifications:
https://support.claris.com/s/article/Claris-FileMaker-19-Technical-Specifications?language=en_US
- FileMaker Pro 19 client Technical Specifications:
https://support.claris.com/s/answerview?anum=000034947&language=en_US
FileMaker Upgrade Instructions
- Request your copy of the newest iRLOCKFILE and iRWEBENGINE from [email protected].
- Review whether or not you need to upgrade your OS for FM 19.6 hardware requirements (see above links).
- Download the FMS, FMP installers appropriate for your operating system and license certificate from your Claris FileMaker download account. They now require 2FA.
- Install FM Pro on the server.
- Copy last night’s backup of your FileMaker Databases, zip the backup and move it to the desktop of the new server.
- Export your Server Script Schedules from your old server in the FileMaker Server Admin Console (https://help.claris.com/en/server-installation-configuration-guide/#save…).In the top right hand corner you will see the word “Server”. It is a link. Click on it and it becomes a drop down menu. Select Export Schedules. A file will be created in your downloads or desktop with the name: fms[vs].settings.settings. Move this file to the new server desktop to be used as an import file in step 10 below.
- Make note of your current plugins
Navigate to the Database Server tab, and the Server Plug-Ins sub-tab. Write down which plugins are enabled (for example: Troi File (no longer needed), Mailit, xmChart (PORTAL only)). - On the old server:
- Disable all the Script Schedules
- Close the database files.
- Stop the server.
- On the new server:
- Stop the server.
- Remove the plugins from the FileMaker Server > Server > Extensions folder.
- Start the server.
- In the FileMaker Admin Console:
- Install and enable the FileMaker Server-side plugins, On the top tab, Connectors, select the left menu item: Plug-ins. On the right, enable both FileMaker Script Engine Plug-ins and Install Plug-in File Script Step.
- Install your SSL Certificate if needed: https://support.claris.com/s/answerview?anum=000026004&language=en_US
- Check your WebPublishing set up. If you have PORTAL Direct, this needs to be turned on.
- Open the iRLOCKFILE with FileMaker Pro.
- Go to > File > Show Hosts > Select your server >
- Click on the icon in the upper right hand corner that looks like a piece of paper. Add “irlockfile” to the end of the network file path.
- Click on the Install on Server buttons on each row for:
- MailIt and xmCharts only if you have PORTAL.
- Import your server schedules
- From the backup file you created in step 6 (On the Configuration tab, select Scrip Schedules on the left menu, on the top right, under Save or Load, select Load. Navigate to your script export file created in step 6.)or follow the directions below for creating the script schedules.
- Check your Backup schedules.
- FileMaker 19 runs a backup every night at midnight. This should be sufficient. The imported script schedules includes backup schedules. You will probably want to disable all of these, as they will use a lot of disk space.
- Reminder: FileMaker Server needs 65% free space on the disk for its own caching. Calculate the backup size and your OS, etc.The Dashboard of the FileMaker Admin Console will tell you the free disk space percentage.
- Keep an eye on your FileMaker Admin Console dashboard for ongoing server disk usage.
Manual Server Script Set up – If you didn’t import the script
This list covers all non-Custom solution server side scripts. You probably do not need to install all of these scripts if you don’t have the module(s). You could have additional Custom scripts that aren’t listed here.
- BROADCASTER – Server-side BROADCASTER Master Script, server/inresonance – Daily, Between 00:01 and 23:59, Every 1 minute, no timeout, no email. https://help.inresonance.com/article/server-configuration-bc3
- PORTAL – PORTAL – tbx– Run Me Nightly – admin/admin-pwd, Daily, At 2pm, no timeout, no email. https://help.inresonance.com/article//setting-portal-4-server-side-script
- ptCharts – Update All Charts (RUN ME NIGHTLY) – admin/admin-pwd, Daily, At 3pm, Every 1 minute, no timeout, no email.
- Generations – tbx – Complete Update of Trans Totals – admin/admin-pwd, Daily, At 1pm, no timeout, no email. https://help.inresonance.com/article/generations-server-side-scripts
- TAM Scripts
iRDS – 1 – Sync Request Injector
Calls script: “MASTER: iRDS Master Script” from iRDataShuttle
Time Limit: 20 min , Abort if time limit is reached
Repeats: Every 5 minutes 12:15 am – 11:59 pm
Uses account: irds_serveriRDS – 2 – Monitor SyncRequests
Calls script: “MONITOR: Sync Request Targets” from iRDataShuttle,
Uses account: irds_server
Time Limit: 20 min, Abort if time limit is reached,
Repeats: Every minute 12:15 am – 11:59 pmiRDS – 3 – Monitor Batches
Calls script: “MONITOR: Batches” from iRDataShuttle
Time Limit: 20 min
Abort if time limit is reached
Repeats: Every minute 12:15 am – 11:59 pm
Between 00:15 and 23:59 for FMS 18
Uses account: irds_serveriRDS – 4 – SCC Imports
Calls script: “IMPORT: School Central Conversions” from iRSCHOOLCENTRALCONVERTER
Time Limit: 20 min
Abort if time limit is reached
Repeats: Every 10 minutes 12:15 am – 11:59 pm
Uses account: irds_server
NOTE: Leave these schedules DISABLED until after the initial push
Update Plugins on the server
- In Admin console
- Disable server side scripts
- Pause files
- Stop Server
- On desktop
- Navigate to server Extensions folder
- On a Mac Server:
HD/Library/FileMaker Server/Database Server/Extensions/ - On a Windows Server:
Windows: [drive]:\Program Files\FileMaker\FileMaker Server\Database Server\Extensions\
- On a Mac Server:
- Remove all extensions
- Navigate to server Extensions folder
- In Admin console
- Start Server
- Make sure files are open
- In FileMaker Pro 19
- Open iRLOCKFILE
- Install Server side plugins
- In Admin Console
- Start scripts
Update Plugins on the client machine
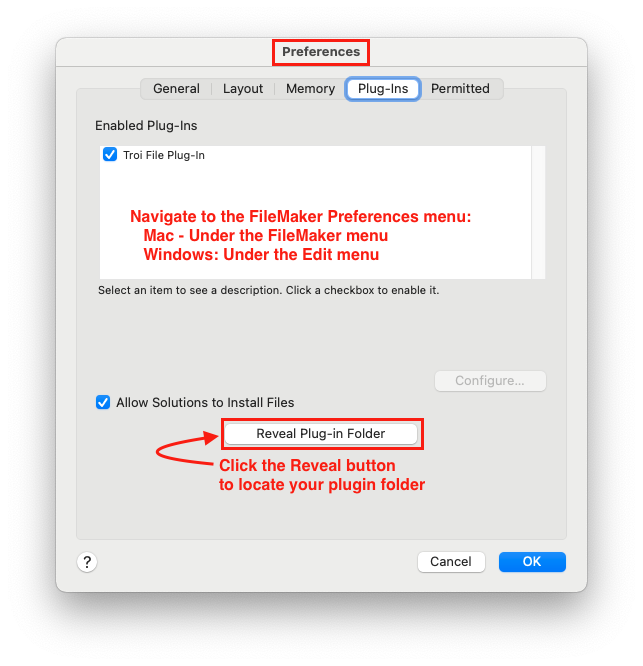
- Open FileMaker Pro:
- Determine the Plugin folder
- Navigate to that folder
- Delete the plugins
- Using the irLOCKFILE, install the new plugins
Please click here to send an email to inRESONANCE support.