Counselor and staff information is managed in the AVCOUNSELORS file. Data should be entered as part of the initial setup process. Students cannot be linked to counselors or staff until the AVCOUNSELORS is populated.
Populating the Counselor File
- Navigate Home > View/Edit Counselor records > Overview.
- Select New Record from the FileMaker Pro Records menu at the top of your screen.
- A new blank record will appear with a unique ID auto assigned.
- Enter the relevant information.
- Be certain to select either Counselor or Support Staff, as appropriate.
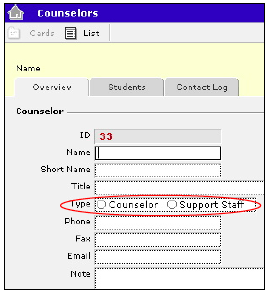
- Enter any notes in the Note field.
Linking Students to Counselors and Staff
- Navigate to Home > View/Edit Student records > Profile > Guidance/Enrollment.
- Find the students for whom you wish to assign a counselor or staff member.
- For each student select the appropriate counselor from the Counselor ID pull down menu.

- If pertinent, select the appropriate support staff member from the Support Staff ID pull down menu.
Caution: Clicking the blue text Counselor or Staff will navigate you to the AVCOUNSELORS file.
Viewing Students Assigned to Counselors and Staff
- Navigate Home > View/Edit Counselor records > Students.
- Find the particular counselor or staff for whom you wish to view assigned students.
- A list of all assigned students for that particular counselor or staff will appear in the display window.
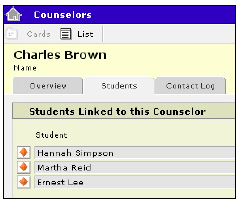
To view only Enrolled or Graduated students, make the appropriate selection from the Filter pull down menu or choose All if you wish to display all students.

- To ensure that you are looking at a complete list, click the Refresh button.
- To view these students in a list format, click the Show button.
- To print this list, choose Print from the FileMaker Pro File menu at the top of your screen.
Viewing Counselors’ Contact Log
You can view all the items that have been logged in the Contact Log for each counselor or staff member.
- Navigate Home > View/Edit Counselor records > Contact Log.
- Find the counselor or staff member for whom you wish to view his or her contact log.
- To view all contacts for a particular academic year, select the year from the Filter.
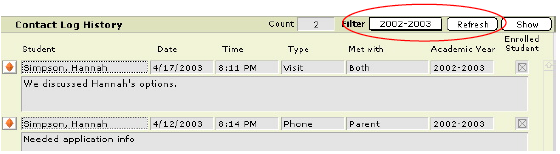
A list of all students for which the counselor or staff member has recorded a contact will be displayed.
- To view all years, make sure the year in the Filter is blank.
- To view Contact Log items in a list format, click Show.
- If you’d like to print the list, select Print from the FileMaker Pro File menu at the top of the screen.
- To create a new entry, click the Create New Contact Log Entry button at the bottom of the screen.

- Find the student for whom you wish to record a contact.
- Enter the contact information.
- Click Add.