You will create custom decision letters inside PWS. These can be published as a personalized letter to each applicant simultaneously on a specific date and time, and/or on a rolling basis, as determined by the Admissions Office.
You can create as many different versions of the decision letter as you require (e.g. Admitted, Admitted with Financial Aid, Admitted with Concerns, Wait List, Denied, etc.).
Your decision letters include merge fields that display data imported from each related record in PORTAL. Before creating your new decision letter, decide which PORTAL fields you want to incorporate into your decision letters.
With PWS 3, Decision letters are now printable in PDF format. Applicants can print their letters as soon as they are made available. In addition, you can preview your Decision and Notification Letter templates, with merge fields, as you create them prior to uploading, by clicking the Preview button in Notifications.
Creating and Editing Decision Letters
- From within PWS, click More > Letters. The Edit Letters window will open.

Enter/edit the following:
- Letter Name: Enter an easily understood Letter Name for the new letter.
- Type: Choose the letter Type from the drop-down menu. This should reflect the admission status of the target recipient. For example, if you are creating a “With Concerns” letter, you may want the Type to be Wait List.
- Format: Select Automatic or HTML Format. In most cases you will use Automatic.
- Date: Select the appropriate merge field (e.g. <<Admission_action_pubdate>>) from the list of Merge Fields on the right. Note that invalid merge fields in the list will be highlighted in pink; these should be corrected.
- Address: Select the appropriate merge fields to build the addressee name and address that will appear in your letter (e.g. <<INQUIRIES::NameFull>> and <<INQUIRIES::P1_address_full>>. You should separate these merge fields with a Return to follow standard address format.
- Salutation: Select the appropriate merge field. Remember to begin with “Dear” and enter a comma after the merge field for salutation.
- Text: Enter the body text of the letter, including merge fields as desired.
- Closing: Enter Closing text and closing punctuation, such as “Sincerely,”
- Signature: Enter the name and title of the person “signing” the letter. If the name of the person exists in PORTAL, you may enter this as a merge field.
- Click Preview to see your letter.

Merge Fields
Using Merge Fields in the Body of Your Decision Letter
You will want to include merged information from PORTAL in the body of your decision letters. This is done by incorporating merge fields into the body text. A merge field will display data from that PORTAL field in each individual letter once your letters are merged; pre-merge, you will see the name of the merge field in the body text.
- To insert a merge field in the body of your letter, place your cursor where you want to insert a merge field.
- See the list of available merge fields on the right; click the merge field you wish to insert at the cursor point. The merge field name should appear at your cursor point.
- Add merge fields to the letter as desired. Remember that they will display data from PORTAL for each record. For example, “<<INQUIRIES::NameFirst>>” will become “John” wherever “<<INQUIRIES::NameFirst>>” appears in John’s letter.
Identifying Merge Field Names
First find the specific names of the fields that you want to incorporate into your letters.
- Open PORTAL.
- Find the field for which you want to know the field name.
- Click the cursor into that field.
- In the FileMaker Scripts drop-down menu at the top of the window, click Show Current Field Name.
- A dialog box will appear telling you the name of that field. It will come in the form of FILENAME::FieldName.
- Take note of this field name or leave the dialog box open while adding a new merge field to the decision Letter List.
Adding New Merge Fields to the List of Merge Fields
There is already a preset list of Merge Fields in the Notification Letters editing window, but if you wish to use a merge field that does not appear, you must add that field to the list.
- At the top right of the Merge Fields list, click New. The Edit Merge Fields dialog box will appear.
- Choose the appropriate file name from the Table Name drop-down list. The name of the table where the field exists is the first word of the field name, for example, INQUIRIES.
- Enter the Field Name. For example, “Inquiry_date”.
- The Merge Text should match the field name in PORTAL. If you have entered a valid field name, the Valid Field checkbox will auto-fill. If the field name you entered is not valid, it will be highlighted in pink and the Valid box will not be checked.
- Click Done. The new merge field will now appear in the Merge Fields list.
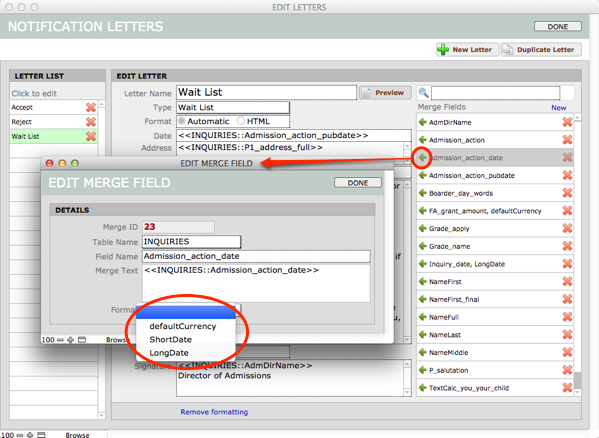
Editing the Format of a Currency or Date Merge Field
You can now add currency formatting (USD and GBP) and date formatting (LONGDATE and SHORTDATE) to merge fields.
- To edit the attributes of a currency or date merge field, click the green arrow at the left of the name in the Merge Fields list on the right.
- Select special formatting for a date field or currency from the Format drop-down menu.