Installing ADVOCATE
An installation document was provided with your ADVOCATE solution. Installation information is also contained in the section ADVOCATE Administration.
Setting Solution Preferences
Once ADVOCATE has been installed, you will need to set your global preferences and values before beginning daily use of ADVOCATE. Please refer to ADVOCATE Administration for details.
Launching ADVOCATE
ADVOCATE can be used as a stand-alone solution by a single user or by multiple users across a network. Your login determines your level of access to the solution and is assigned by your solution administrator. You may want to contact your solution administrator to learn how to access ADVOCATE.
If ADVOCATE is located on your computer:
- Launch FileMaker Pro on your desktop computer.
- From the File menu, select Open if the Open dialog box does not appear.
- Navigate to the ADVOCATE directory.
- Open the ADVOCATE file.
- If you have purchased ADVOCATE LITE type your name and password in the login screen.
- Click Log In.
- If you have purchased the open version of ADVOCATE, you will be presented with a FileMaker Pro dialog box. Type your FileMaker Pro password.
OR
- Find the ADVOCATE file located on your computer and double click on it to open it.
- If you have purchased ADVOCATE LITE, type your name and password in the login screen.
- Click Log In.
- If you have purchased the open version of ADVOCATE, you will be presented with a FileMaker Pro dialogue box. Type your FileMaker Pro password.
If ADVOCATE is being served across a network and is not located on your computer:
- Launch FileMaker Pro on your desktop computer.
- From the File menu, select Open if the Open dialog box does not appear.
- Click the Hosts button from the Open file window.
- A list of available files will appear in the window.
- Double click the ADVOCATE file.
- If you have purchased ADVOCATE LITE, type your name and password in the login screen.
- Click Log In.
- If you have purchased the open version of ADVOCATE, you will be presented with a FileMaker Pro dialogue box. Type your FileMaker Pro password.
The ADVOCATE file will open on your desktop. As you move throughout the program, other files will become visible on your desktop. As you work, you want to keep files open rather than closing them each time you move to another file. Closing files means that every time you click a button or icon that navigates to another file, that file will have to reopen, thus slowing down the performance of ADVOCATE.
Quitting ADVOCATE
To quit ADVOCATE, navigate Home and click Log Off in the upper left corner of the screen. This will close all open files and navigate you to a dialogue box. From here click Exit.

It is important that you quit ADVOCATE properly as doing otherwise may damage your files.
ADVOCATE Card Views
Data entry screens are consistent throughout ADVOCATE. These screens are comprised of the following areas: Task Bar, Header, Card, Data Entry, and Record Status Bar.

The Task Bar
The ADVOCATE Task Bar contains the name of the file along with the Home icon. Clicking the Home icon will take you to the Home screen of the ADVOCATE file.

The following icons are located in the ADVOCATE Task Bar. These icons, when clicked, navigate you to another location in order to perform a defined task. From left to right these are:

The Header Area
The Header area, located just below the ADVOCATE Task Bar, contains identifying information about the displayed record particular to the active file. This information is automatically generated when key information is entered about the student, counselor, application, or college. These fields are all searchable using FileMaker Pro’s Find mode.

The Data Entry Area
The data entry area of card views enables you to view data located within the current file as well as data contained in other files. Sometimes this data is editable and sometimes it is for viewing purposes only. Refer to the section on Text and Field Colors below for detailed information on how to determine whether data is editable or not.
The Record Status Bar
The Record Status Bar is located at the bottom of the screen and displays the date and time of record creation and modification along with the person who created and/or modified the record. The creation and modification names are dependent upon the user name entered into the user’s computer operating system or can be customized from within FileMaker Pro’s Application Preferences menu.

Status Icons

Text and Field Colors
The color of text and fields in ADVOCATE indicates important information and provides you with a visual clue of where it is possible to enter or edit data, when related data are being displayed from another location, what data can be overridden, and what data should only be changed with consideration.

- Black text in a white field indicates that data may be entered or modified in this field.
- Black text in a gray field indicates that the data originates from some other location in the solution and may not be edited in this location or the data is the result of a calculation automatically generated by the solution and is not editable.
- Red text indicates that the data is a Primary Key and should be altered only when you understand completely the implications of doing so. Primary Keys are “the glue” of the solution and relate data in one file to data in another file. Changing Primary Keys may result in data no longer being related to other data. Use caution when changing Primary Keys.
- Blue underlined text, when clicked, either navigates you to another location or displays a dialogue box requiring further action.
- Yellow fields (Override fields) indicate that the data in another field may be overridden with data entered in the override field.

Override Fields
Based on information that is entered into the solution, ADVOCATE makes certain calculations that assist you with specific tasks. For example, as you enter parents’ first and last names, ADVOCATE automatically calculates salutations and names for labels. Override fields are provided that allow you to change these automated calculations to suit individual needs. If the custodial parent names entered for a student are John and Mary Reid, yet the couple prefers to be addressed as Mr. and Dr. Reid, their preference can be entered into the Salutation override field. Address labels and salutations will be generated accordingly for this couple.

Additionally, for each college there is an application due date field. However, you are able to override this due date on an application-by-application basis in an override field on the individual application record.
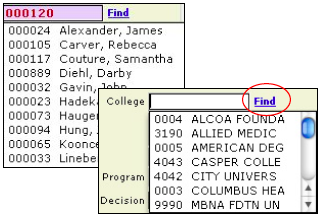
Guided Finds
Throughout the solution there are dialog screens that assist you in finding a student, a college, or a counselor. Merely click the word Find when it appears, select either the person or the item you are looking for from the list or, if that is not possible, type in the name and click Find. ADVOCATE will find that record if it exists and navigate you there. If there is more than one record that matches the selected or typed criteria, a list will appear. Merely click into the record you desire and click Continue.

Pop Up Menus
There are various pop up menus throughout the solution that, when clicked, display a list of items to choose from. Select your choice by scrolling down the list of items to the desired one and releasing the mouse button.

When the menu items are students, clicking in the field will display a list of all students alphabetically. When the menu item is a list of colleges, clicking in the field will display only those colleges that have been marked as Favorites. To find a college not marked as a favorite, use the associated Find button.
Scripts
There are a variety of ADVOCATE scripts available in the FileMaker Pro Scripts menu located at the top of your screen. These scripts, when selected, execute a series of stored procedures to assist you with specific tasks. Scripts are specific to individual files.

Navigating in ADVOCATE
Managing your guidance data in ADVOCATE requires you to navigate to various locations within the solution depending upon the task at hand. Sometimes this means navigating to a different screen (layout) within the same file and other times it means navigating to another file. There are consistent navigational tools to assist you throughout the solution as you do your work.
In general, when moving between fields, you should either click into the field in which you wish to enter or modify data or Tab to the next field. Using the Return or Enter key will create a hard return (or new blank line) in the field and may cause your data to display incorrectly on other screens.
General File Organization
Data in ADVOCATE are organized into a variety of files all related to one another through Primary Keys. This enables you to quickly access and view your data in a variety of ways. Student and parent biographical information is contained within the AVSTUDENTS file. Overview screens in AVSTUDENTS allow you to quickly view summary information of related data that reside in other files.
For example, you can view a summary of all test data for a particular student within his or her record in AVSTUDENTS even though individual test data are stored in other files (AVPSAT, AVSAT, AVAP, etc.).

Another example of how related information located in another file is viewable in the AVSTUDENTS file is college application information. You are able to view a list of all colleges a student has applied to from within AVSTUDENTS, yet that data resides in the AVAPPS file. To view a specific application in more detail you would navigate to the individual application record located in the AVAPPS file.
There are navigational tools to assist you throughout the solution so that moving from general overviews of your data in AVSTUDENTS to detailed views of related data in other files is easy and usually just a click away.
The ADVOCATE File (Home)
There are multiple ways to navigate within ADVOCATE. The most efficient way is to use the ADVOCATE Home screen that opens when you launch the solution. The Home screen has buttons, that when pressed, take you to your primary work areas—students, applications, test data, counselors, and colleges.

To return Home from any screen, press the Home icon at the top left of the screen. Or you can type CMD 1 on a Macintosh computer, or CTRL 1 on a PC, as a short cut.
FileMaker Window Menu
Because ADVOCATE is a FileMaker Pro based solution, you can use the FileMaker Pro Window menu located at the top of your screen to navigate between open files. Simply select the file you would like to navigate to from the available list.
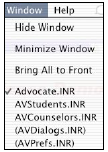
Note: Only solution files that have been opened will be available from the Window menu.
Your Desktop
Any files that are currently open on your desktop can be accessed by clicking anywhere in the open window of the desired file. This will bring that file to the forefront, making it the active window.
Navigation Tabs and Sub Tabs
Tabs are provided on most card views of your data to provide access to screens (or layouts) within the same file. Depending upon the Tab, secondary tabs or Sub tabs may be available and are located directly below the tabs. Clicking on a Tab or a Sub tab will navigate you to that screen (or card) within the current file.

Navigation and Action Buttons

