While this is not documentation on using FileMaker Pro, basic FileMaker Pro concepts need to be understood in order to use ADVOCATE efficiently. USING FILEMAKER PRO AND IR SOLUTIONS explains how iR solutions use FileMaker Pro to manage your data.
Four Modes of FileMaker Pro
FileMaker Pro has four modes—Browse, Find, Layout, Preview—that control how the data or the database can be manipulated. You need to understand the difference between the four modes, be aware of which mode is active, and know how to change between them. Most users will have access to all the modes and will use them at different times as needed. It is possible to restrict access to the Layout mode using passwords if desired. Refer to the FileMaker Pro User’s Guide for more information on configuring passwords.
You are able to switch between modes by one of the three following methods.
- Use the FileMaker Pro View menu located at the top of your screen to select a mode.
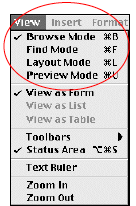
- The current mode name is always displayed at the lower left of the active window. Click and hold the pull down menu at the bottom of the window to choose a different mode.

- Use keyboard shortcuts. These are shown in the View menu.
FileMaker Pro behaves differently depending upon which mode is active. Menus displayed at the top of the screen change as do items in the Status Area, or the area to the left of the screen.
The Status Area can be toggled open and closed with a button that is located at the bottom of the window, next to the name of the mode. This can be quite alarming and confusing to new users. The Status Area and the Rolodex will return when the button is clicked again.

The Rolodex
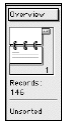
The Rolodex is the name for the object in the upper left of the screen that looks like a common round card catalog. It is at the top of what is called the Status Area. The Rolodex is the primary tool for moving between records in Browse mode, between layouts in Layout mode, between Find Requests in Find mode, and between pages to be printed in Preview mode. The appearance of the Rolodex will change depending upon which mode is active.
Browse Mode
The Browse mode is the main mode used when operating a FileMaker Pro solution. It is used for basic navigation, data entry and editing, and printing or exporting.
While in Browse mode the Rolodex provides a great deal of information about the records in the file. The number in the lower right is the number of records in the file.
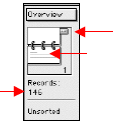
You can move to other records by several methods. Clicking on the Rolodex page will move either up or down through the records. When the database displays the first or last record of the file, the Rolodex will show lines on only one of the cards. Clicking the stick on the right and dragging it up or down will move you rapidly through records. The number at the bottom can be selected by clicking on it and then entered from the keyboard. Clicking Enter will move the database to that new record.
Different users can be in the same records at the same time, viewing, searching, printing, and sorting. When one guest clicks into a record, that record is then locked across the system. Anyone else trying to edit that record will get a message telling them to wait until the current user is finished. Tabbing out of the field saves any change that is made across the entire system. There is no need for a save step.
NOTE: The concept of Save is different in FileMaker Pro than in other applications. Once a change has been made and you tab out of the changed field, the change is saved to the system immediately and all other users see the change instantly. The Save As option under the File menu is used to save the entire database to a new location and is generally not available to guests logged into the system.
Find Mode
The Find mode is used for searching or querying the database. This is sometimes called “sort” in other databases. This documentation follows the FileMaker Pro convention and uses the term “find”.
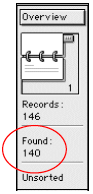
FileMaker Pro can do multiple or Boolean finds that include “and/or” logic. FileMaker Pro can also do multiple searches, negative searches, and find fields that are empty. Finds can be done across multiple layouts. All the fields do not have to be on one layout to do a combination find. All navigation buttons are active while in Find mode. Once a find has been done, the Rolodex will display the current Found Set of records.
CAUTION: One of the most common errors for early users is to start searches before switching to Find mode. If the user is not in Find mode, clicking in fields changes the actual data. It is important to get used to seeing a blank page before starting a Find.
When the database is put into Find mode, it displays a blank version of the current layout that can then be entered to set search criteria. There is no need to create or save queries or finds. You do not have to search for saved queries to search the database. Any guest can perform a find on any layout at any time, and it does not affect the other guests on the system.
It is possible, however, to save finds using a script. While this is possible, it is generally not needed because of the easy manner of finding in FileMaker Pro. Occasionally, however, it is useful to save some finds so that they can be used as subscripts for more complex scripts.
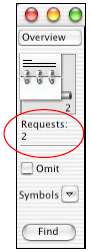
While in Find mode the Rolodex shows the number of find requests in the database and the number at the bottom is the current request. Clicking the Rolodex moves from request to request. To add additional requests use New Requests under the menu item Requests. This menu item is only available when the database is in Find mode. To understand how to perform Finds effectively in FileMaker Pro, refer to the FileMaker Pro User’s Guide or any FileMaker Pro reference book.
Layout Mode
Layout mode is used to create or edit new layouts. A layout is a way of interpreting or viewing the data already in the database and is linked to all records and data in the database. Different layouts are not bound to certain data. A layout in FileMaker Pro may be what in other databases is called a screen, a list, a report, a label, a printout, an envelope, a letter or a merge. In FileMaker Pro these are all just different kinds of layouts.
There can be hundreds or thousands of layouts in a given FileMaker Pro file. Each layout can contain one or more fields that are contained in the file or related fields from other databases. Creating a new field in the database does not automatically place that field on the current layout; and there are fields in the database that do not appear on any layouts. Conversely, the same field may appear on numerous layouts. Changing the data in a field on one layout will change the data in that same field in all layouts where that field exists without any kind of update. Each layout is looking at the SAME data if the same field is on multiple layouts.
TIP: By default there is a setting in Preferences that places a newly defined field onto the current layout. This is generally unhelpful and should be turned off when FileMaker Pro is installed on a given computer. These preferences are set by selecting Edit > Preferences > Application. Another useful preference to set is to enable Drop and Drag in the Preferences menu.
Using Layout mode it is possible to change essentially any part of the solution. Caution should be exercised to avoid doing damage to the usefulness of the system. Before making changes to the system you should be familiar with the open user database guidelines and should know what you can and should edit.
CAUTION: With open iR solutions you can go behind the scenes to learn about layout objects, buttons and interface schemes by opening the files and studying them. We encourage our users to use these databases as learning tools, but caution them to either use a copy of the databases or to be careful not to change things as they explore and study.
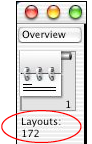
When the Layout mode is active the Rolodex shows the number of layouts in the system. Clicking on the Rolodex moves you from layout to layout. Pulling the Layout menu tab down will show all the layouts that exist in the database. Since Layout mode is used to create and edit navigational elements like buttons, those elements do not operate while in Layout mode. The new FileMaker Pro menu items–Layouts and Arrange are only available when in Layout mode. Most of the operations to be performed in Layout mode are found under the FileMaker Pro Layouts menu.

Moving to other databases while in Layout mode will require using the FileMaker Pro Window menu. The Window menu always contains a listing of all open databases.
NOTE: There is some confusion with the term Layout Menu. The pull down menu above the Rolodex is called the Layout menu, and it contains a listing of all layouts in the system. Technically it is the Layout Pull-down Menu, but no one uses the longer form. There is also a menu that appears when you are in Layout mode, called Layouts. Obviously this too is a layout menu. You will have to learn from context how the term is being used.
To learn how to create layout elements and edit them refer to any standard reference on FileMaker Pro, including the FileMaker Pro 5.0 documentation that came with the software. No attempt is made here to explain how to create or edit layout items using FileMaker Pro.
Preview Mode
The Preview mode is similar to Print Preview available in word processing and spreadsheet programs. It shows how the layout will look when printed, which may be quite different than what the layout looks like in Browse mode. While in Preview mode you can use the File menu to access Page Setup to change printers or print orientation. As you close the window, the screen will redraw to show the changes.
Different versions of operating systems, different version of FileMaker Pro, different print drivers and different printers may cause the same screen to print differently. Standardizing these as much as possible will eliminate most, but not all, inconsistencies. This mode is fairly WYSIWYG (“what you see is what you get”), but there are some instances where the printout will vary or be clipped. This is generally more of a problem on Windows computers than with Macintosh computers, but on both systems Preview is fairly accurate.
One of the most common problems when operating a FileMaker Pro solution is that navigation buttons do NOT operate in Preview mode. This can leave new users confused because all will appear normal but buttons won’t work and data cannot be edited. It is important to be aware of which mode is active.

When the database is placed in Layout mode, it makes calculations about how the screen should look, using the current printer selected and the Page Setup selections, and displays how the current layout will look when printed. Certain layouts only show their true “form” when seen in Preview mode. A label layout for example will only show a group of labels as a continuous row until viewed in Preview when they will be properly shown as a sheet of labels. Additionally, page numbers will not be calculated correctly until the layout is seen in Preview mode and/or until the layout is printed.
Sub-summary reports are the most important kind of layouts that must be shown in Preview mode. A subsummary report only shows each category once with the sub-data grouped below that. This is not visible in Browse mode, however, and can be very confusing.
While in Preview mode the Rolodex shows the number of the pages to be printed in the current report, and the number at the bottom is the current page number. Clicking the Rolodex moves from print page to print page.
Data Entry, Editing and Field Navigation in FileMaker Pro
Data can be entered into the solution in Browse mode. Data entered or changed on one layout will appear on all other layouts that use those same fields. Because all the databases are related to one another in ADVOCATE, data entered or edited in one database or file will affect the same data in the other databases.
To move from field to field when entering data, use the Tab key and not the Enter or Return key. Using these keys will add an additional line within the current field rather than move to the next field. This is different than the standard practice with older DOS databases and may be confusing or frustrating for users of older systems.
When layouts (or screens) are created, the default tab order is to move left to right and top to bottom through the fields. The tab order for each layout is separate and can be changed while in Layout mode, however.
TIP: It is important to develop the habit of using Tab to move between fields. Using Return or Enter will add extra lines to the data causing mysterious extra lines in printouts. If your report or labels do not print correctly, check to see that there are no extra lines in the particular field.
A major attempt has been made to provide you with a logical and consistent scheme for moving through the solution. At times however it may be easier to simply move “outside” the navigation scheme to locate the screen or file that you need. This can be done through the FileMaker Pro Windows menu located at the top of your screen or by clicking on a non-active window (file) on your Desktop to make it the active window (file).