Once the initial inquiry and family records are created either via the Input screen or through PWS you will want to add additional family information as it is made known to you. You will do this by finding the particular family and entering new information or editing existing information.
PORTAL tracks up to three families or households per child. The custodial family record is created at the time the inquiry record is created and is linked to the child. However, some children have multiple families. These additional family records can be created and edited at any point once the initial inquiry and custodial family records are created.
Completing Family Information
The PORTAL Input screen is designed to quickly enter inquiries and basic family information into the solution. Once this is accomplished, you will want to enter more detailed information to complete the family record.
- Navigate to INQUIRIES > Overview and find the child for whom you wish to enter additional family data.
- Click the Parents tab and click either the Family 1 or the Family 2 subtab depending on the family information you wish to enter.
- Complete and correct any Name or Address information.
- Complete Contact Information.
- Click the Work tab and enter information.
- Click the Notes tab and enter information.
- From the Family record, click the green arrow next to the red Family 1 (or Family 2) ID. This will put you into FAMILIES > Overview.
- Click the Contact tab to enter Emergency Contact information.
Creating Family 2 Records
Generally, Family 2 information is not known at the time an inquiry is initially created so it cannot be entered using the standard input process. Instead, Family 2 records are created in INQUIRIES after the initial inquiry and Family 1 records are created. This process will automatically create a new family record in FAMILIES, designate it as a Family 2 or Other and link it to the child.
- From INQUIRIES, find the desired child for whom you wish to create a Family 2.
- Navigate to > Parents > Family 2.
- Enter family information.
As soon as information is entered in any field, the Family 2 record will be created and linked to this child. The ID Family 2 will be automatically assigned.
Linking and Unlinking Families
Sometimes it is necessary to link an existing inquiry record to a different family record than the one to which it is currently linked. You may have linked the records incorrectly from the Input screen or an existing family becomes a Family 1 or a Family 2 at a later date. Linking and unlinking families and inquiries is easy and is accomplished on the Link Families screen.
Linking an Inquiry to an Existing Family
If the family already exists in the solution, you need only to find the family record and reestablish the link.
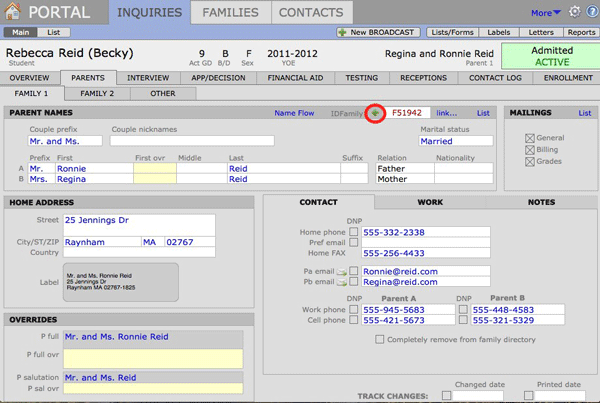
- From INQUIRIES, find the child to whom you wish to link a family.
- Navigate to Parents > Family 1. It doesn’t matter whether you are linking to a Family 1 or a Family 2 at this point. You just need to navigate to the LINK FAMILIES screen.
- Click the link button located next to the IDFamily to open the LINK FAMILIES screen.

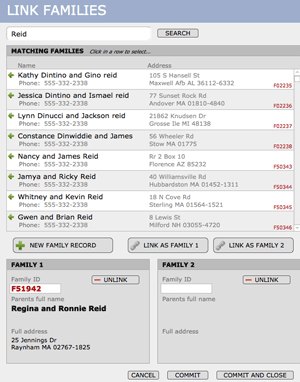
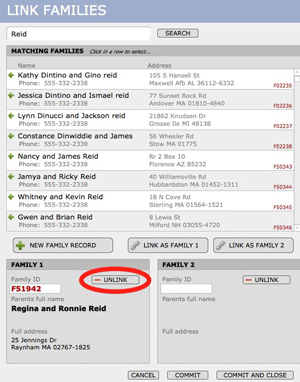
The child’s name is automatically displayed at the top of the screen. The child’s last name is automatically entered in the search field at the top. Any families that are currently linked to this child will be displayed in either the Family 1 or the Family 2 areas at the bottom of the screen. Additionally, any families with the same last name will be displayed in the MATCHING FAMILIES area. If no family is linked to this child, the Family 1 and Family 2 areas will be blank.
- If the family that you wish to link to exists in the MATCHING FAMILIES area, click on it to highlight and select it.
- Click the LINK AS FAMILY 1 button to link the selected family to the child as a Family 1.
- Click the LINK AS FAMILY 2 button to link the family as a Family 2.
- To search for a different family, type the last name in the Search field at the top of the screen and then press Tab to initiate the search.
Families with that last name will appear in the MATCHING FAMILIES area. Click on the desired family and enter desired information.
These steps may be repeated if the student needs to be linked to both a Family 1 and a Family 2.
Click the COMMIT or COMMIT AND CLOSE button when you are finished. Or click CANCEL to close the LINK FAMILIES screen and take no action.
Linking an Inquiry to a Family That Does Not Already Exist
If a SEARCH box does not return any matching families, a new family record will need to be created. Simple click the NEW FAMILY RECORD.
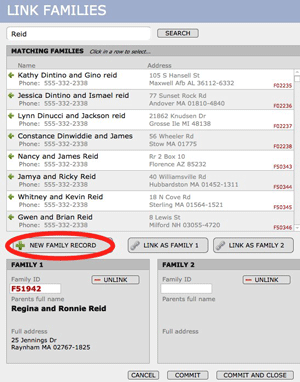
- The NEW FAMILY dialog box opens up.
- Complete the information and click CONTINUE.
- This will return you to the LINK FAMILIES screen. Notice that the family you added is now displayed in the MATCHING FAMILIES area. You may have to scroll to the bottom of the list if there are many names listed.
- Click on the family to select it. The row will highlight in black.
- To link the selected family to the student as a Family 1, click the LINK AS FAMILY 1 button. To link the family as a Family 2, click the LINK AS FAMILY 2 button. The family information is displayed in the Family 1 or Family 2 areas.
- Repeat these steps if the student has both a Family 1 and a Family 2.
Unlinking Families
If you decide you want to change the designation of a family as Family 1 or Family 2, you can use the UNLINK button on the LINK FAMILIES screen to break the link. The family record will NOT be deleted from the FAMILIES file, but only unlinked from the child.
- From INQUIRIES, find the child whom you wish to unlink from a family.
- Navigate to INQUIRIES > Parents and either the Family 1 or the Family 2 screen.
- Click the link button to open the LINK FAMILIES screen. The student name is displayed at the top of the screen. Any family that is currently linked to that child will be displayed under either FAMILY 1 or FAMILY 2.
- Click the UNLINK button next to either Family 1 or Family 2. The family information will be cleared and the existing link broken. The family record is not deleted from FAMILIES.
- To locate a family with a different last name, or to link the student to another family, follow the steps outlined in the section LINKING FAMILIES.
- Click the COMMIT AND CLOSE button when you are finished.
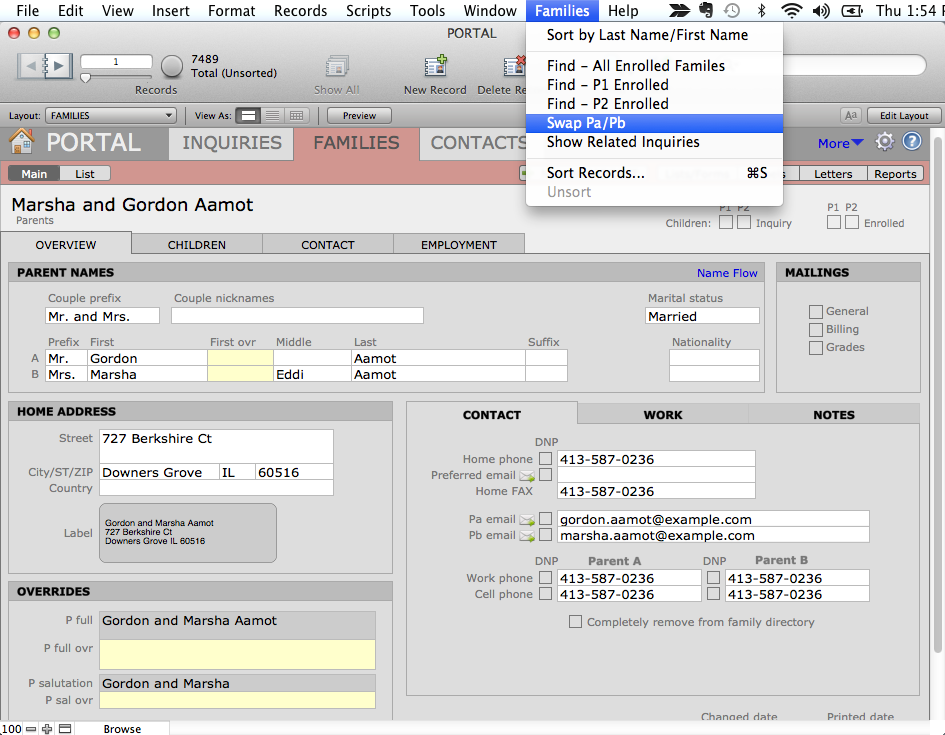
Swap Pa and Pb in PORTAL
If you want to swap all the data for Pa and Pb, so the original Pa becomes Pb, and vice versa:
- Click on the FAMILIES tab.
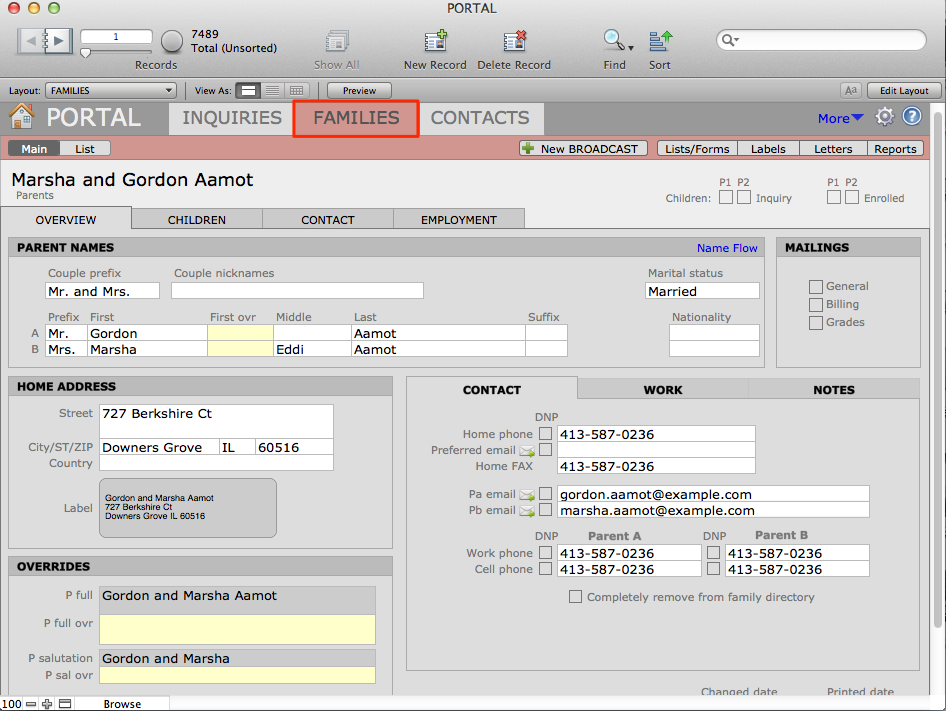
- Click Swap Pa/Pb in the FileMaker Families menu.