In SchoolForms Online, when you are publishing forms for the next academic year, enrollees are those currently enrolled students who will be returning, and those who have been admitted for the next year. After you have built your forms, you assign them to enrollees. Forms can be assigned to every student or to a found set of enrollees built on some criteria, or on an individual basis. Once you have assigned forms, you will upload enrollee data to the website. This merges individual record data with individual forms.
The workflow for creating accounts in SchoolForms Online is:
-
- Sync accounts.
- Enable access.
- Resolve conflicts.
- Notify accounts.
Sync Accounts
Sync Accounts identifies all the potential accounts/roles that are appropriate for SchoolForms Online.
NOTE: Sync Accounts works on a found set. If you want to sync accounts for all students, select Show All records before you perform the sync. If you wish to work on only one student, do a find for that student (or group of students) before you perform the sync.
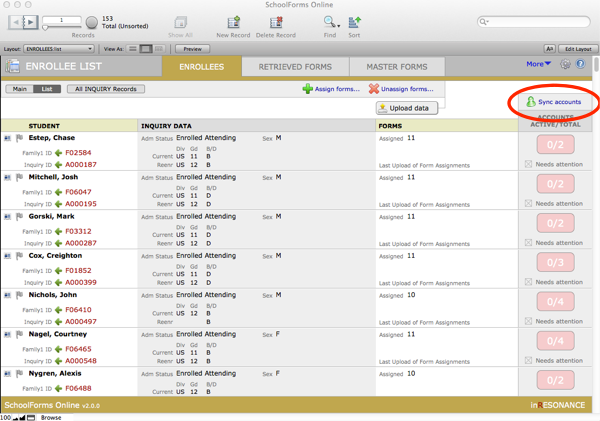
- Within SchoolForms Online > Enrollees tab, perform a find to gather your found set.
Look at the right-hand column of the Enrollee List.
- Click Sync accounts.
There may be a slight delay while SchoolForms Online processes your sync.
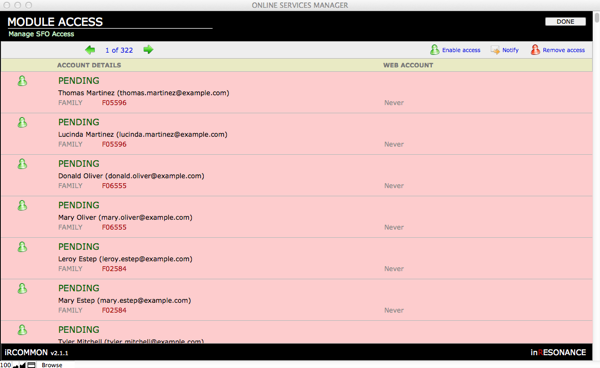
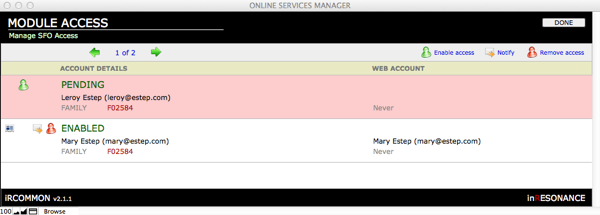
The Module Access screen opens, displaying a list of all possible accounts/roles for this web service (SchoolForms). Note that you have entered iR COMMON, but you are looking at a filtered view specific to your web service.
The first time you perform a sync, all possible accounts/roles will appear with a status of Pending; they will be highlighted in pink.
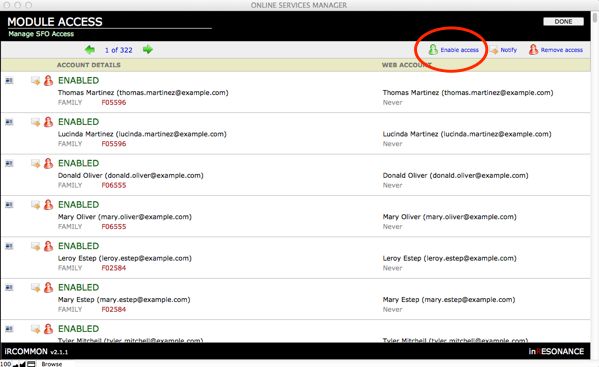
Enable access
In the Module Access screen, buttons that appear in the task bar across the top of the list—Enable access, Notify, Remove access—will act on every record in the found set.
- Enable access for the found set of accounts by clicking the button in the top task bar.
Resolve conflicts
- Scroll through your list to find highlighted records. These highlighted records have errors or conflicts that need to be resolved.
- White records (no highlight) – This role is enabled for this account.
- Pink highlight – This role is pending, not enabled. This usually indicates a conflict because one email address is being utilized by two people in this account family.
- Orange highlight – The role is attached to an account, but there is a conflict with data in the account family. A data conflict could be something as simple as a name appearing as all caps instead of what is expected. Click here for more information on resolving orange conflicts.
REMINDER: If you change data in your solution for an enrollee, remember to Upload data before you perform a Sync. An example might be if parents divorce and you create a new family record with a new family ID in your solution: Upload data.
Web services accounts are created based upon an email address. Each account must have a unique email address. If there are two records in Module Access with the same email address, one account will be flagged as having a conflict.
NOTE: If two potential accounts have the same email address, it is impossible to predict which of the two accounts needs to be changed. Which of the two records is highlighted will be determined strictly by the order in which accounts were created: the first one is created and the second one with the same email will be flagged. The point is, the highlighted account (which was created second) may be correct, and the one that was created first (but not highlighted) may in fact be the one that needs to be changed.
- Click Resolve conflict. A window showing the detail of the account will open.
- Determine whether the information in the white band at the top is correct (name, email, ID). Take special note to compare the IDs displayed.
- If the information in the white band is wrong,
- Correct it in the source (your core solution).
- Return to the web services file and Sync accounts.
- Find the account and enable it again.
- If the information in the white band is correct,
- In the bottom left-hand area, select the correct account or enter a new email address.
- Click Enable access. If the account already had a different role for the same module, that role will be overwritten (information from the left will overwrite information on the right).
- If the information in the white band is wrong,
- Repeat until all accounts have been created and enabled.
- When you are satisfied, click Done. This will return you to the Enrollees screen.
NOTE: If ever you want to return to the Module Access screen, perform a sync. There is no penalty affecting the work you have already done creating accounts if you perform a sync.
Review active accounts
Check to see that all of the accounts you wish to activate are ready. In the Sync accounts column, accounts that are fully ready are green. Accounts that require review are pink.
- On the Enrollees screen, perform a find for any records where Needs Attention is checked. Accounts that need attention are those where not all of the total possible accounts for a student are active.
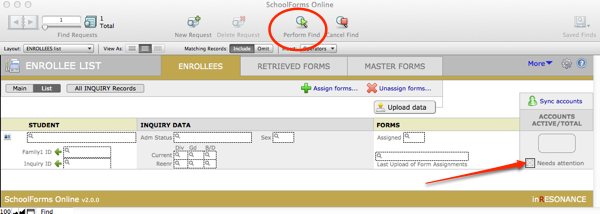
- If your find produces any records that are not enabled, click into the pink ACCOUNTS ACTIVE/TOTAL button to see a list of all possible accounts related to a student.
The Module Access interface will show you all the possible actions you can take for any one account. The buttons on the left act upon only the individual record.
NOTE: You do not have to enable every account. There will be cases where you do not want to enable an account.
- Decide if you wish to enable the accounts with a Pending status. If yes, click on the Enable access (green) figure.
- Click Done.
- A dialog box will appear to confirm your action.
Notify Accounts
- After you sync, enable, and resolve conflicts, click Notify