An orange highlighted account in SFO means the role is attached to an account, but there is a conflict with data in the account family. A data conflict could be something as simple as a name appearing as all caps instead of what is expected.
If you encounter an orange highlighted record while enabling access to accounts in SFO, follow these directions:
- Click on the card icon at the far left of the highlighted record.
- This will bring up the Module Access Detail window.
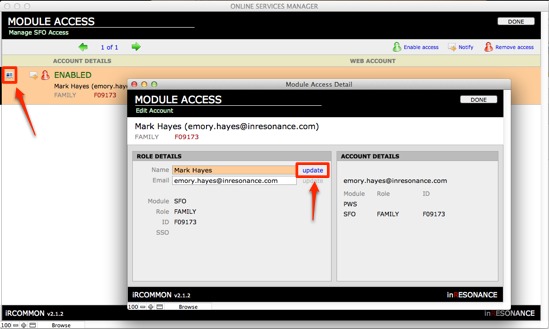
- Next to the orange highlighted field click Update. This will make it so that the record is no longer highlighted.
- The conflicting data has now been resolved.
Resolve conflicts
Web services accounts are created based upon an email address. Each account must have a unique email address.
If there are two records in Module Access with the same email address, one account will be flagged as having a conflict.
- After a sync, scroll through your list to find highlighted records. These highlighted records have errors or conflicts that need to be resolved.
- Click Resolve Conflict. A window showing the detail of the account will open.
- Determine whether the information at the top is correct (name, email, ID).
- If the information is incorrect due to a data entry error—such as a typo in the email address, for example,
- Correct it in the source (your core solution—FAMILIES or PERMRECS).
- Return to the web services file (SFO) and sync accounts.
- Find the account and enable it again.
- If the information is incorrect either because an account was created with incorrect information, or because the ID used to create the account is no longer correct, as after a divorce,
- Select the correct account or enter a new email address.
- Click Enable access. If the account already had a different role for the same module, that role will be overwritten.
- If the information is incorrect due to a data entry error—such as a typo in the email address, for example,
- Repeat until all accounts have been created and enabled.
- When you are satisfied, click Done. You will be returned to the SFO Publish to Web screen.
NOTE: If ever you want to return to the Module Access screen, perform a sync. There is no penalty affecting the work you have already done creating accounts if you perform a sync.
The following training video provides helpful insight to resolving common account issues.
Please visit the iR Common Resolving Conflicts page for written instructions.