FileMaker is the connector moving data between SchoolForms Online and PORTAL, KEYSTONE, or SANDBOX. Use the Field Map to define the source of data coming from your solution that will pre-populate a field on your form as well as the destination in your solution of any data you retrieve after a form has been submitted by the family.
One central Field Map (connected by a button on the Master Forms screen) serves all your forms, with fields that may be used repeatedly (such as Student Name or Parent Phone). The central Field Map is based on fields, and is independent of the forms.
NOTE: A field needs to be listed on the Field Map only once. It may be used in multiple forms. A field will be listed more than once if the Upload/Download designations vary.
Also, within each form, you have the opportunity to map fields that are specific to that one form only (such as a transaction number field or submission timestamp). Both instances are covered in this article.
Not every field needs to be pre-populated from, or imported into, your core solution. You must add to the Field Map:
- Any field that needs to be pre-populated with data from your solution.
- Any field that is designed to bring data into your core solution.
- Any field that will be formatted as a Date Drop Down or a Date Panel, even if the data in the field will not be imported. The Format as Date checkbox in the Field Map must be checked for all date fields.
Field Mapping Workflow
- Make sure the source field or destination field exists in your solution.
- Make sure the field is added to the Field Map.
- Add the field to your form.
Mapping fields in SchoolForms Online
- Click on the the Field Map button in the Master Forms domain.
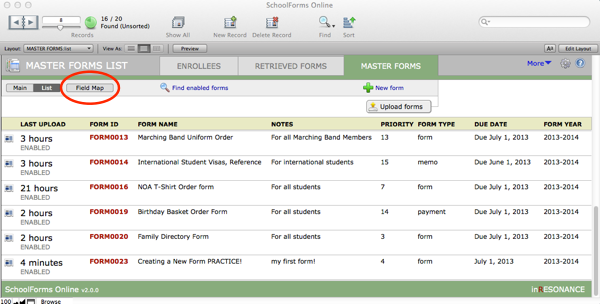
This navigates you to the Field Map List.
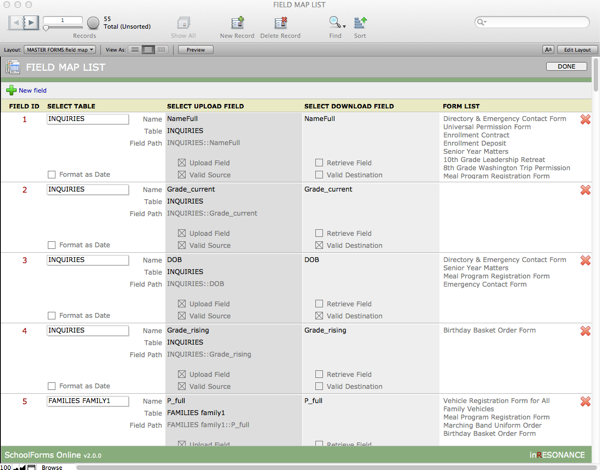
The Field Map List is a list of every field used in your online forms that is already mapped to your core solution. On this screen, for each field used, you see the following columns. Note that when you map a field, as soon as you specify the field name, some details autofill.
- Field ID – is a unique number for each field in your Field Map; it is automatically assigned by SchoolForms Online when you add a new field to the Field Map. Since the Field Map is a central reference for all forms, one ID serves as a connector to one field no matter how many times it appears on your forms.
- Select Table – specifies the Table ID. Here is a checkbox for you to check Format as Date.
- Select Upload Field – This is the field from which SchoolForms Online will populate the field as it displays to your families. In this column, you will see Field Name, Table, Field Path, Upload Field checkbox, and a checkbox that autofills if this is a Valid Source.
- If Valid Source is not checked, then the field as mapped does not exist in the database. Check to see if you specified the wrong table, or misspelled the name.
IMPORTANT: Make sure that the Field Name has no trailing spaces or carriage returns. If these invisible characters are at the end of the Field Name, the Valid checkbox will seem to be correct, but the data will not import.
- Select Download Field – This is the field to which SchoolForms Online will push data after a form has been submitted by your families. In this column, you will see Field Name, Table, Field Path, Retrieve Field checkbox, and a checkbox that autofills if this is a Valid Destination.
- If Valid Destination is not checked, then the field as mapped does not exist in the database. Check to see if you specified the wrong table, or misspelled the name.
- Form List – see all the forms in the Master Forms List that utilize this field.
- Delete button (red X) deletes this field from the list.
NOTE: Before you delete a field from the Field Map, look at the Form List to be sure it is not being used in any active forms.
NOTE: The Upload Field (source of data) and Download Field (destination of new data collected) do not have to be the same field. You can determine what form element data will be pre-populated and from where. And you can determine the fields where the data will go in PORTAL, KEYSTONE, or SANDBOX when you retrieve data.
- Some fields might be uploaded but never downloaded, such as a student’s Tuition Due.
- Some fields might never be uploaded but would be downloaded, such as a Parent’s signature confirmation.
- If you want to store data and compare it to the previous year, you will want to add a new destination field.
- If you want to compare Family1 and Family2 answers, you might want a new destination field.
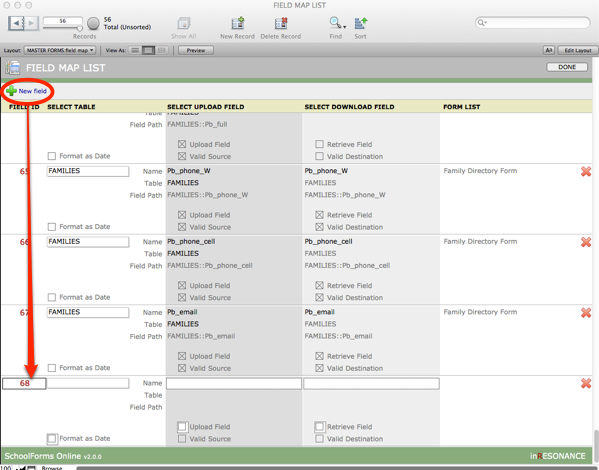
Adding a New Field to the Field Map List
- Click on +New Field button at the top left task bar area. This will add a new record at the bottom of the Field Map List.
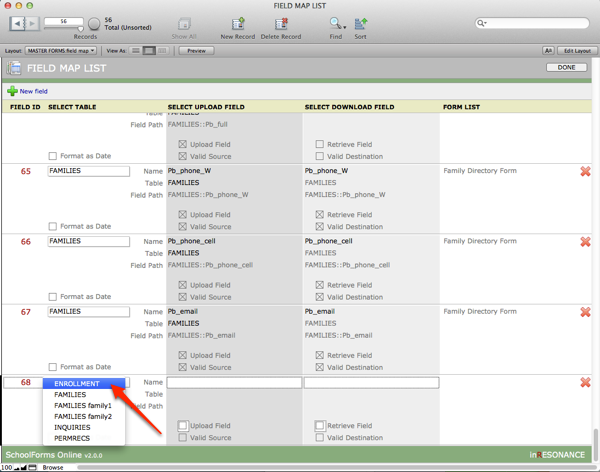
- Select Table that will be related to this new field from the drop-down menu.
- Select Upload Field – Enter the name of the field from the selected table that you wish to add to the Field Map as an upload field. (You will have to know the name of the field you intend to use.) Select Upload Field by checking the checkbox within that Field ID if you want to prepopulate the field with data from your solution.
- Select Download Field – Enter the name of the field from the selected table that you wish to add to the Field Map as a download field. (You will have to know the name of the field you intend to use.) Click the checkbox for Retrieve Field.
- Valid Source and Valid Destination are auto-calculated by SchoolForms Online.
- As you add this new field to your forms, you will see as list of the forms that utilize it in the Form List column.
NOTE: If you will be using the same field differently on two forms—perhaps uploading data on one form but on another, you will be allowing the family to change the data—you must have two records on the Field Map. That is, if the upload/download designation you are setting for the new use of the field is different from what has been defined previously, you will create a new record.
- Format As Date – This checkbox must be used in conjunction with the Date Drop Down or Date Panel element type whether or not the Datebox will actually be uploaded/downloaded. For more information on FAD click here.
WARNING: Do not check Format As Date for Date of Birth. This will cause an error.
- Click Done.
- The new field will be available in the Choose Field window.
Mapping fields specific to one form only using Form Map
Within the Main view of a particular form, on the Advanced tab, you can map Submitted Form Attributes, single-use fields that have been auto-generated by the act of submitting a form. These fields are specific to a submitted form, into a destination field in the solution. These single-use fields can assist you in reconciling transactions from your credit card Merchant Account:
- submission date
- transaction number
- order ID
- reference number
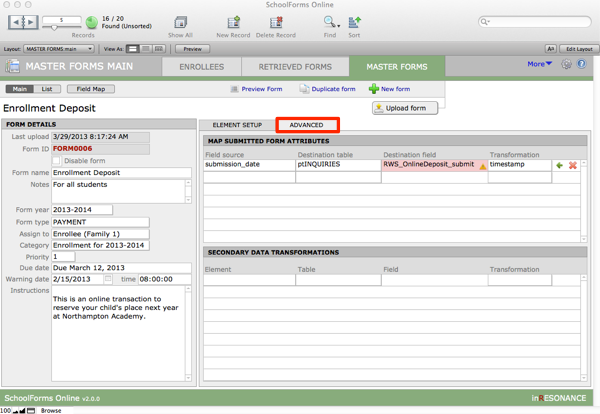
NOTE: When mapping fields, a pink highlight will alert you when any of your fields are not valid.
Also on the Advanced tab, using Secondary Data Transformations, you can map retrieved data into a second destination, in a different table. For instance, you might collect a Nickname for a student and map it into the PERMRECS file in KEYSTONE; you might also want to map it into ptINQUIRIES so your data is consistent in both locations.
The source field may be auto-generated by the act of submitting a form, or it may be an element you add to the form.
Mapping form-specific fields
- In the Main view of a Master Form, navigate to the Advanced tab.
- Select a Field Source or an Element from your form.
- Select the Transformation that must be applied as data is pushed into the destination field. (see definitions and examples of Transformations, below)
- Select the destination Table.
- Name the destination Field.
- Click Upload form to save your changes to the website.
![]()
Transformations
A Transformation is required when a form collects data in a format that is different from the format of the destination field. For example, your form may ask “Do you intend to apply for Financial Aid?” with a Yes/No answer. In your solution, you want a Yes reply on a form to mark a checkbox. This requires a transformation.
The pre-supplied transformations in SchoolForms Online include:
bool
A boolean transformation changes data into “1” (checks the box) or “null” (no check). This transformation will change any numeric value, or Y, to a check.
date
No matter what the format of your Date Drop Down or Date Panel, the date transformation will convert the date entered into the proper format for your date destination field.
time
No matter what the format of the time field on your form, this transformation will convert the time entered into the proper format for your time destination field.
timestamp
No matter what the format of the timestamp field on your form, this transformation will convert the time entered into the proper format for your timestamp destination field.