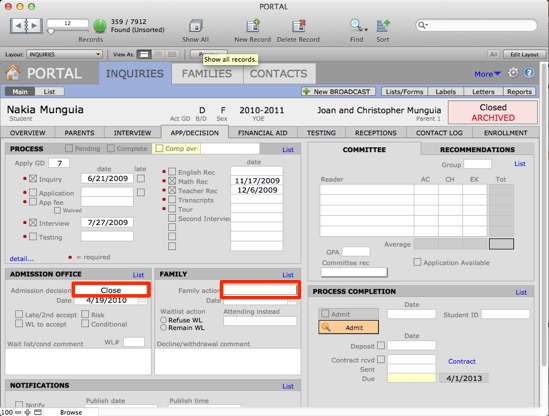
Throughout the process of evaluating prospective students, it is important to record Admission decisions and Family actions. Track actions and decisions in INQUIRIES on the App/Decision tab.
For a full explanation of the concepts underlying the tracking of Admission and Family Decisions, see the article on PORTAL Concepts: The Admission Realm.
The following are the possible scenarios when accepting, declining and waitlisting students:
- School accepts a student and the family accepts offer
- School accepts a student, but the family declines offer
- School rejects/declines a student
- School places an applicant on the Wait List: Family decides to remain on Wait List, and an appropriate space opens; Family decides to remain on Wait List, but no appropriate space opens; Family declines Wait List
- Family decides to not complete the process (DNCP)
- Family stops communicating with school, Admissions office decides to close their application
- “Summer Melt”: Family has submitted an Enrollment Contract, then decides not to attend
Case 1: Admission Decision = Accept, Family Action = Confirm
- Navigate to the INQUIRIES domain.
- Click the App/Decision tab.
- Record the Admission Decision as Accept.
- Record the date this decision was made in Date.
- Check the Risk box if applicable.
- Record comments about this decision (such as a conditional admittance) in Comments.
- Notify family and send contract. Record the date the contract was sent in Date Sent.
- Record the Family Action as Confirm.
- Record the date this decision was made in Date.
- Record the date their contract was received in Date Received.
- Click Contract to show its completion.
- Once the student’s enrollment deposit has been sent in, click Deposit.
- Fill in the date the deposit was received in Deposit Date.
- Click the orange Admit button to finish their inquiry record. The date will auto-fill, and they will be ready to be imported into ksSTUDENTS.
The Adm/EnrStatus will change automatically to Admitted. Today’s date is entered into the Admit Date. On the App/Decision screen the Admit checkbox located in the Process Completion area is marked and the Pending box located in the Process area is unchecked. On the Enrollment screen the Enrolling Next Year checkbox, located in the Reenrollment area, is automatically checked.
NOTE: You must use the orange Admit button to fully admit the student. If this is not done, their record will not be imported into ksSTUDENTS during the import process.

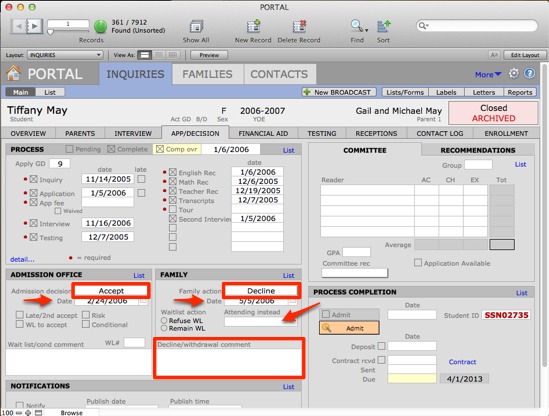
Case 2: Admission Decision = Accept, Family Action = Decline
- Navigate to INQUIRIES domain.
- Click the App/Decision tab.
- Record the Admission Decision as Accept.
- Record the date this decision was made in Date.
- Check the Risk box if applicable.
- Record comments about this decision (such as a conditional admittance) in Decline/Withdrawal Comments.
- Notify family and send contract. Record the date the contract was sent in Date Sent.
- Record the Family Action as Decline.
- Record the date this decision was made in Date.
- Record any Decline/Withdrawal Comments.
- Record the school they have accepted in Attending Instead.
- This record is now complete.
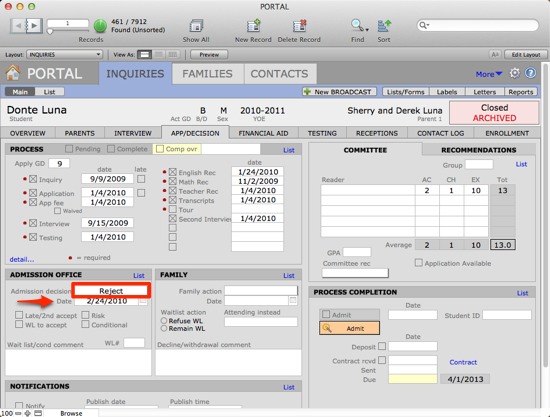
Case 3: Admission Decision = Reject
- Navigate to INQUIRIES domain.
- Click the App/Decision tab.
- Record the Admission Decision as Reject.
- Record the date this decision was made in Date.
- Record any comments in Comments.
- The record is now complete.
Case 4: Admission Decision = Waitlist
Case 4a: Family Action = Remian on Wait List, Space Opens
- Navigate to INQUIRIES domain.
- Click the App/Decision tab.
- Record the Admission Decision as Wait List.
- Record the date this decision was made in Date.
- Record comments about this decision in Wait list/Withdrawal Comments.
- Keep the Family Action blank for the time being.
- Check the Remain WL box.
- When space becomes available, check the WL to Accept box, notify family and send contract.
- Record the date this decision was made in Date.
- Record the date the contract was sent in Date Sent.
- Record the date their contract was received in Date Received.
- Click checkbox Contract rec’d to show its completion.
- Once the student’s enrollment deposit has been sent in, click Deposit.
- Fill in the date the deposit was received in Deposit Date.
- Click the orange Admit button to finish the process. The date will auto-fill, and they will be ready to be imported into ksSTUDENTS.
NOTE: You must use the orange Admit button to fully admit the student. If this is not done, their record will not be imported into ksSTUDENTS.

Case 4b: Family Action = Remain on Wait list, No Spaces Open
- Navigate to INQUIRIES domain.
- Click the App/Decision tab.
- Record the Admission Decision as Wait List.
- Record the date this decision was made in Date.
- Record comments about this decision in Wait list/Withdrawal Comments.
- Keep the Family Action blank for the time being.
- Check the Remain WL box.
- When space does not become available, notify family.
- Record the date this decision was made in Date.

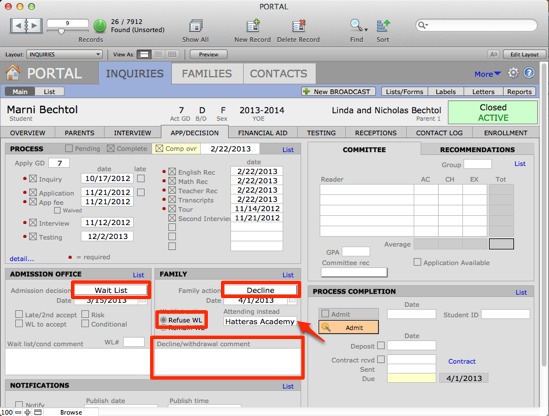
Case 4c: Family Action = Decline Wait list
- Navigate to INQUIRIES domain.
- Click the App/Decision tab.
- Record the Admission Decision as Wait List.
- Record the date this decision was made in Date.
- Record comments about this decision in Wait list/Withdrawal Comments.
- Keep the Family Action blank.
- Check the Refuse WL box.
- Record the date this decision was made in Date.
- Record any Decline/Withdrawal Comments.
- Record the school they have accepted in Attending Instead.
- This record is now complete.
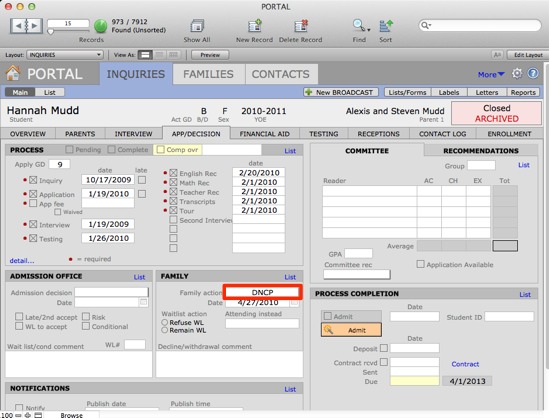
Case 5: Family Decision = DNCP
- Navigate to INQUIRIES domain.
- Click the App/Decision tab.
- Keep the Admission Decision blank.
- Record the Family Action as DNCP; note this indicates a decision made by the family to not continue.
- Record the date this was chosen in Date.
- This record is now complete.
Case 6- No Family Activity, Admission Decision= Close
- Navigate to INQUIRIES domain.
- Click the App/Decision tab.
- Record the Admission Decision as Close; note this indicates a decision by the Admission office to close the application.
- Keep the Family Action blank.
- Record the date this decision was made in Date.
- This record is now complete.
Case 7: Summer Melt
- Navigate to INQUIRIES domain.
- Click the App/Decision tab.
- Click the orange UnAdmit button.
The AE Status changes to whatever the status was before the Admit Script was run. The Admit Date is cleared. The Admit checkbox is cleared. The Enrolling Next Year checkbox is cleared.
- Record the Family Action as Decline.
- In Decline/Withdrawal Comments, record why the family declined after sending in their contract.
- This record is now complete.

Offering Contracts
Generally, when you have accepted a child, you send the family a contract. If your contracts have been set up in PORTAL you can run them from inside PORTAL. If not, you will still record that a contract has been sent and when it is due.
- Navigate to the INQUIRIES > App/Decision screen.
- Find the inquiries for whom you wish to print contracts.
- Sort the records in some order, if desired.
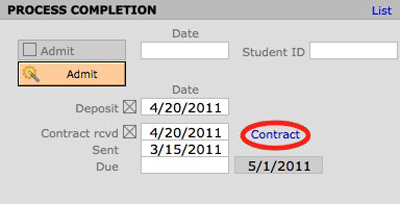
- Click the blue Contract button in the Process Completion area.
- To print, select Print from the FileMaker Pro File menu at the top of your screen.
- In the Process Completion area, record that a deposit has been received by placing a checkbox next to Deposit.
- Enter the date the deposit was received next to the Deposit checkbox.
- Indicate that a contract has been sent by placing a checkbox in the Contract checkbox.
- Enter the date the contract was Sent and the date it is Due. The Contract Due Date is a preference in PT Prefs. This will be written into every Inquiry record. You can overwrite this on a record-by-record basis as needed on the App/Decision screen.