Build a Payment Form when you want parents to make a purchase online at the time they submit your form. Your form may collect payments by credit card; depending upon your agreement with your Merchant Services Provider, you may also collect payment by e-check (EFT).
Critical Components of a Payment Form
- Set Form Type as Payment.
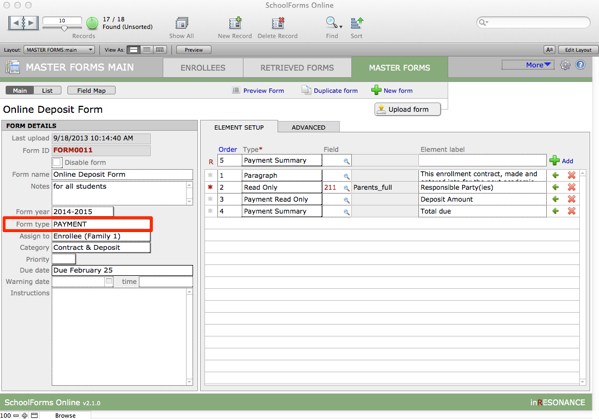
When you assign a form type of Payment, the menu of possible elements you can add to your form expands to include seven payment element types:

Regardless of the payment elements you use on your form, the element that makes the form work is one of the last elements you will add:
- Your last payment element should be a Payment Summary. This element does the math of the form and passes the total amount on to the next page, which is where the payment transaction is completed.
The Continue Button
At the bottom of a payment form is a Continue button (not a Submit button as on non-payment forms). The Continue button opens the window where the payment transaction takes place. You get a Continue button when you have a Payment Summary element on your form.
Payment Elements Explained
Payment elements collect transaction amounts. These amounts are automatically totalled as the form is filled out. You must include a Payment Summary element on your form: this running total determines the transaction amount that will be passed to the payment transaction page when the parent clicks the Continue button.
NOTE: The value placed in an element in a payment form must match the label being entered. Make certain you are charging the customer the amount you say you will charge them for an item.
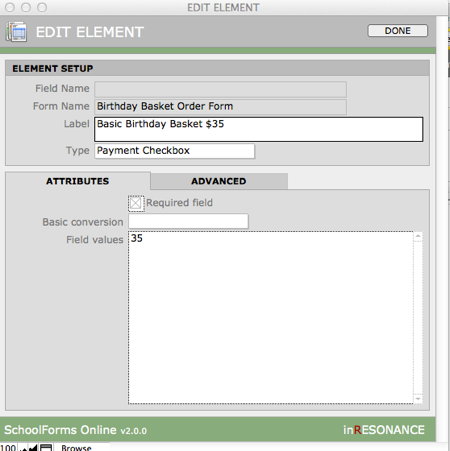
PAYMENT CHECKBOX
Use the Label to describe the item and also show its cost on the form. Enter a currency amount as the Field Value; the field value is the amount that is added into the calculation.
PAYMENT CHECKBOX GROUP
In the Edit Element window, enter the currency value to the left of a Substitution pipe and the text display to the right of the Substitution pipe. That is, the value on the left of the Substitution pipe should match the cost of the item as you describe it on the right of the Substitution pipe.
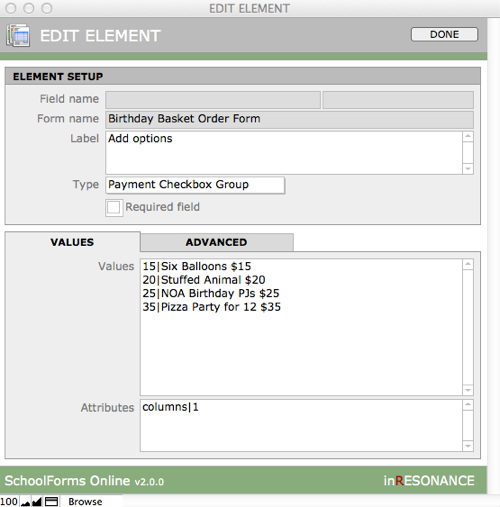
In the example below, in addition to entering the currency value to the left of a pipe, you can add a semicolon and a second value that can both be pushed to your solution. This gives you additional data, which can be especially useful if things are the same price.
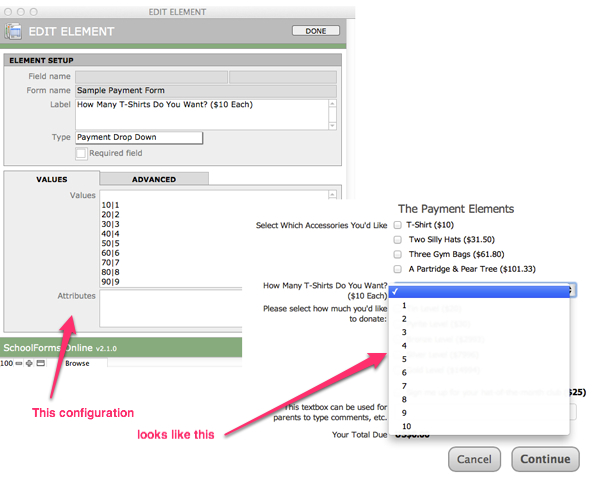
PAYMENT DROP DOWN
Values can be displayed in a drop-down menu format. Only one value can be selected in a drop-down menu.
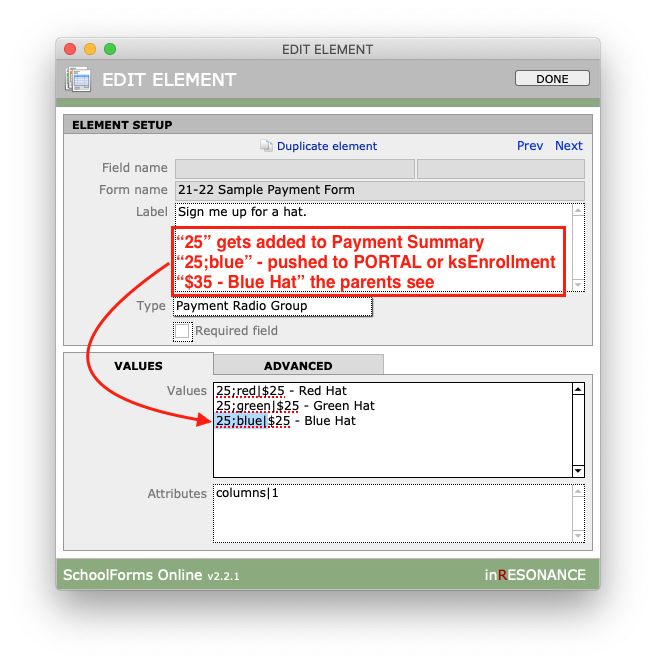
PAYMENT RADIO GROUP
A Payment Radio Group element is used for a short list of possible purchasing choices. Only one value can be selected.
PAYMENT READ ONLY
A Payment Read Only element is very versatile: you can either map in a value from your core solution or you can type in a value in Edit Element.
PAYMENT SUMMARY
The Payment Summary element must appear on a payment form, or the form will not work. This field will show the running total of all the options selected on a payment form. This calculated value will be the amount charged on the credit card transaction for the form.
PAYMENT TEXTBOX
A parent can enter an amount they wish to pay or contribute when you provide a Payment Textbox.
Edit Element: Values and Attributes
The element you choose, and the values and attributes you assign to your element, determine the appearance of your element on the form. Edit an element by clicking the green arrow at the right end of the record row.
![]()
Here is an example of similar choices being displayed differently:
Setting a Form to Accept e-Checks Only
The default for payment forms is to accept whatever forms of payment are allowed by your Merchant Services Provider (MSP). If your MSP relationship allows you to accept e-checks, you can configure a form to accept Checks only.
- Open your Master Form and navigate to the Advanced tab.
- Click the Payment Options checkbox named Check. Now your form is set to accept only e-checks. Note that your MSP account must allow you to accept e-checks.
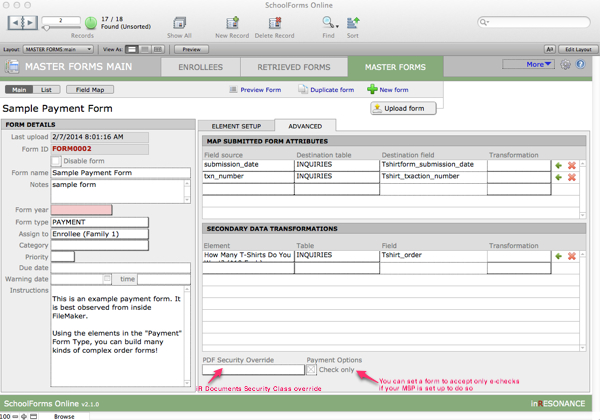
Setting iR Documents Security Class
On the Advanced tab of your Master Form, you can set an override Security Class for a particular form. When you retrieve this form, it will be brought into iR Documents with the override security class.
Payment Services Settings
When we have delivered your files to you and you have received your account credentials from your Merchant Services Provider, you will give inRESONANCE your account credentials so we can enter them into the appropriate settings.