One of the benefits of SBWS is its ability to transfer information gathered through your online Inquiry and Application directly into SANDBOX.
When SBWS is implemented, iR maps any information that you are collecting on your forms that correspond to standard fields in SANDBOX. You can certainly create custom SANDBOX fields to hold any information that is not standard to SANDBOX.
With SBWS you control what information is required before a form is submitted. You also control the values that appear in any drop-down menu, like Year of Entry, Inquiry Source, or country list. All of this is done via the Source Map in SBWS.
CAUTION: While it is possible to repurpose a field here, you mustn’t. Change the label of a field as it appears on your form, but do not change the underlying meaning of a field. Please contact [email protected] to discuss your ideas for revision, as repurposing a field improperly may break your functionality.
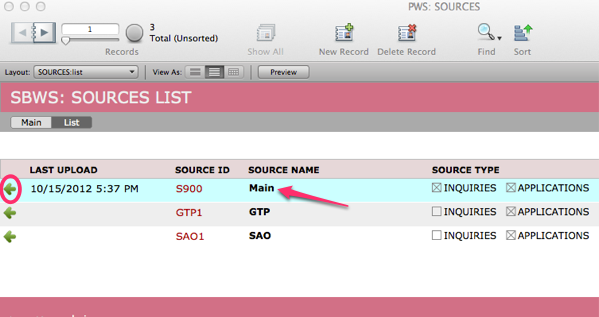
- In SBWS, click More > Sources to open the SBWS: SOURCES window.

- If you accept applications from Gateway to Prep (GTP) or Standard Application Online (SAO), you will see this screen. Click on the green arrow next to Main to navigate to SBWS: SOURCES MAIN.
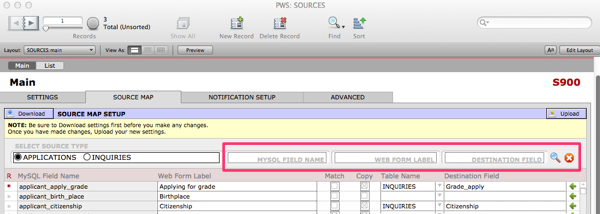
- Navigate to the SOURCE MAP tab.

- Select either APPLICATIONS or INQUIRIES under SELECT SOURCE TYPE to ensure you are mapping the appropriate form.

- IMPORTANT: Always click Download after you select either Applications or Inquiries and before you edit anything on the Source Map, to ensure that you are editing the current version. That is, you must click Download for the Inquiry and Download for the Application. These are separate actions. One Download will not affect both.

The Source Map Setup screen is where you can see and edit the following information about every field on your online Inquiry form or Application. First select the radio button for either Applications or Inquiries. You will see the fields on your online form, and the field in PORTAL to which each is mapped.
IMPORTANT: Always click Download before editing the Source Map. (That is, you must click Download for the Inquiry and Download for the Application. These are separate actions. One Download will not affect both.) And always click Upload after editing the Source Map. (That is, you must click Upload for the Inquiry and Upload for the Application. These are separate actions. One Upload will not affect both.)
Each field is described by the following:
- Required – If you see a red asterisk in this column, the field is Required on the form. You can click this column to activate, or de-activate the red Required asterisk.
- MySQL Field Name – This is the name of a particular field in the SBWS database.
- Web Form Label – You can always find this identifier, as this is the label that displays on your online form.
- Match checkbox – Any field with this box checked will become one of the fields on the Records Link screen that assists you in determining if an existing record in SANDBOX matches an inquiry or applicant.
- Copy checkbox – Any field with this box checked will become one of the SANDBOX fields listed on the Records Sync screen into which data from the online form will be copied.
- Table Name – This shows the location of the destination field in SANDBOX.
- Destination Field – This is the field in SANDBOX into which the data collected online will be copied.
How to find the field you want to change, in the Source Map
As there may be many fields in your online forms, use one of the three Search boxes at the top of this window to search.
- Make sure you have clicked the radio button by Applications or Inquiries.
- Click Download, and then find your field by:
- MySQL Field Name
- Web Form Label – This will be the easiest to use. Just find the field on your form and see what its label is.
- Destination Field
- Type into the search field. The list of possible matching fields in the list below will be narrowed down as you type, so you can select the exact field you seek from a shorter list.
- If you do not see the field you want, or if you have completed your task, click the red X to end the search and return to the full list.

- Once you find the field you want to edit, click the green arrow at the right end of the row for your selected field. This will navigate you into the Edit Source Field window.
![]()
- Most of the time, the editing you want to do will occur in the Attributes tab.
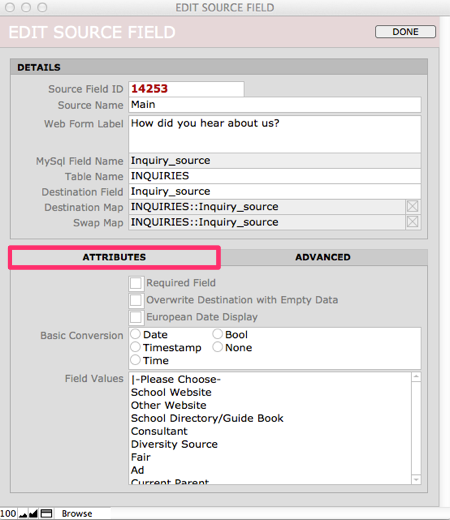
Edit Source Field Attributes
The Attributes tab in Edit Source Field is where you define:
- This is a Required field.
- When you check Overwrite Destination with Empty Data, the effect occurs on the Records Sync screen: if data exists on the right side (SANDBOX record) but the incoming data from the online form is blank/has no data, overwrite the existing data in the SANDBOX destination field with nothing. (not recommended)
- European Date Display, when checked, will format a date field in the European format.
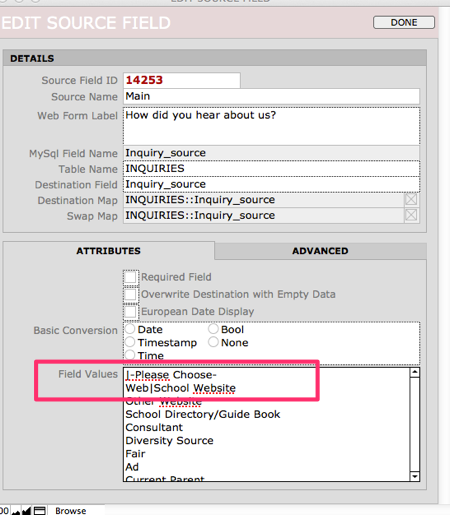
Field Values
- Create values for a drop-down list here. Values will appear in the order in which they are entered.
- Use a Substitution pipe (this is a keyboard character that appears above the backward slash on your keyboard) to separate what will be sent into the destination field in SANDBOX as a value from what will display in your value list. That is, Web|School Website will display “School Website” in the drop-down list, but, when imported into SANDBOX, it will be “Web”. Or, |-Please Choose- will display “-Please Choose-” at the top of your drop-down list, but, if the applicant does not choose anything and leaves the drop-down list untouched, no data at all will be imported into SANDBOX.
Basic Conversion Attributes
Certain types of fields need to undergo a conversion as they are imported into SANDBOX. For example, the question “Will you request Financial Aid?” may be a checkbox, or it may have a Yes/No choice on the application. No matter how it is formatted on your application, this data will be imported into SANDBOX as a checkbox (checked or not checked). It becomes a Boolean value (1=yes; null=no). This is the role of Basic Conversion Attributes.
If you have a field that will be imported into SANDBOX as a Checkbox field, it must have the Boolean radio button checked and also must have a Field Value 1.

Adding Hints
If you want to add a “Hint” that will appear to the right of a field, select the field to edit, and choose the Advanced tab in Edit Source Field.
The field label will display to the left of the field, and the hint will display to the right. A common use for a hint is to show an applicant how to format a phone number.

Creating New Fields on online forms
If you wish to add new fields on one of your online forms (Inquiry or Application), please contact iR. If you wish to add a field that is not currently in SANDBOX, please follow the steps outlined below to create your new field in SANDBOX before contacting iR about adding the field to your form.
Creating New Fields in SANDBOX
It may be that you want to gather data from an inquiry or applicant that does not now exist in SANDBOX. In that case, you must first create the new field in SANDBOX; then you will create the field in SOURCE MAP SETUP; finally, you link the two fields. Note that you will need access to SANDBOX Layout mode to accomplish this.
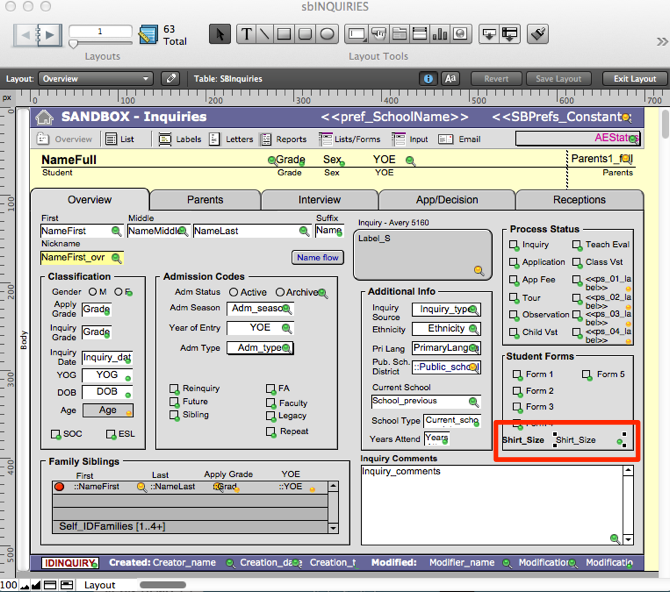
For this example, we will be adding a T-Shirt Size field.
- Open SANDBOX to the screen where you want to add the new T-Shirt Size field.
- Enter Layout mode.
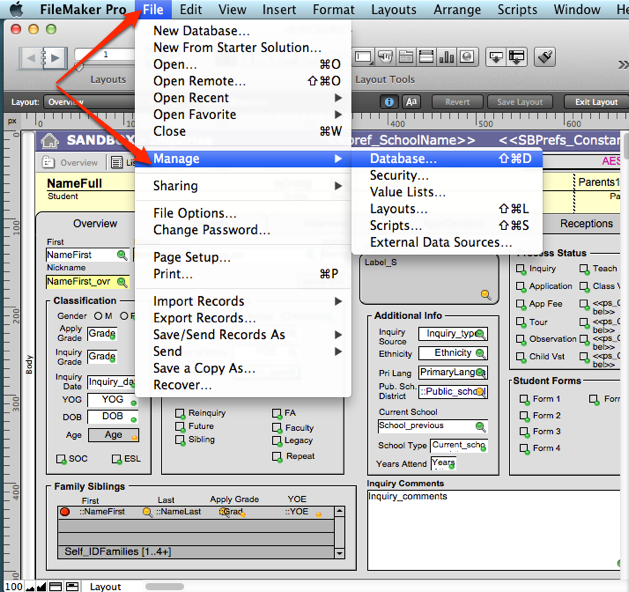
- Using the Filemaker Pro File menu, select Manage > Database.
- Create a New Field; in Field Name, separate words with an underscore (no spaces in the name).
- Choose the Field Type (in this case, it is a Text field).

- Click Create to add the new field to the list of fields.
- Click OK.
- Navigate to the place in the layout where you wish to put your new field.
- Click the Field/Control Tool button.

- Drag to the position where you wish to place the new field.
- When you let go of the mouse, the Specify Field dialog box will open. Highlight the field you have just created.

- Click the Create Label checkbox.
- Click OK.
- You will now see your new field and its label.
- Select the field and use the navigational arrow keys on your keyboard to adjust its position on the layout.
- Select the label and use the navigational arrow keys on your keyboard to align it with the new field.
- Double click on the label to edit it.
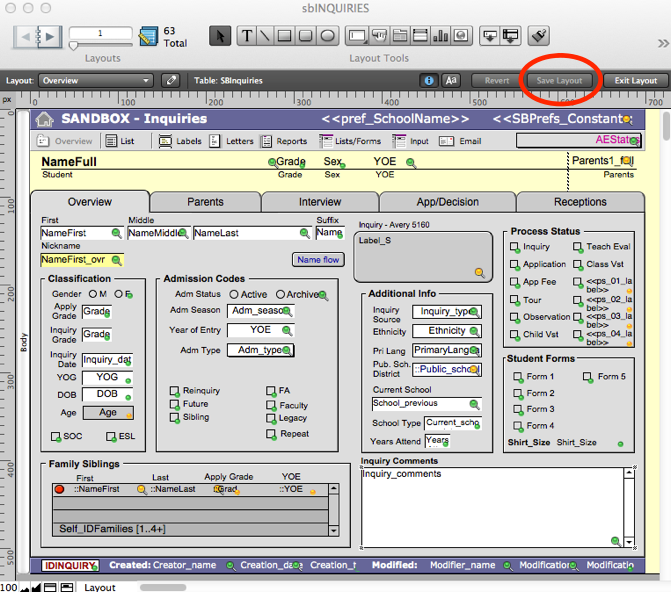
- Click Save Layout to save your changes.
- Click Exit Layout to return to Browse mode.

- Contact [email protected] to add the new field to your form.