here are two approaches to creating a new form:
- Create a new form from scratch.
- Duplicate, then modify, an existing form. Work from duplicates rather than destroying a master form. Older forms that have been taken out of service can be Disabled.
The workflow for creating a new form is:
- Review the paper form that will serve as your prototype and plan which form type and form elements will work best for your form.
- Select the form type.
- Enter form details.
- Add form elements.
- Edit form elements.
- Map fields.
- Preview form.
- Upload form.
- Test form.
Form Building Tips
- Never ask for the same piece of information on two different forms. This is because we are bringing the data into the database. Asking for the same data repeatedly just overwrites the data.
- The Label appears to the left of your element.
- If you want to add some white space between elements, insert a Checkbox Group with no label, or a Paragraph with just a carriage return as the label.
- Remember you can type any number into the Order field as you create or edit an element, and all the following elements will re-number.
Creating a new Master Form
- Navigate to SchoolForms Online > MASTER FORMS Tab.
- Enter the Main view.
- Click the +New Form button.

- A unique Form ID has been automatically assigned.
- Next is a checkbox that allows you to Disable a form. Best practice is to disable any form that will not be used in the current year.
Enter the following information:
- Form name – this is the name that appears on the website.
- Notes – For internal purposes only. These notes do not display on the web. This is a good place to describe the target group to which the form will be assigned. The Notes field is searchable, so it is useful for filtering the list of forms when assigning them.
- Form year – Specify the Academic Year for which this form is collecting data. The Form Year is locked into the PDF of every submitted form, for future reference. The Form Year attached to a form also controls which year’s Enrollment Record any Enrollment data mapped onto the form will be copied into when processed. If no Enrollment record with a matching form is present, the data cannot be copied.
- Form type – Specify the type of form: form, memo, payment.
- Assign to – Forms are assigned to Enrollees. The Assign To drop-down menu allows you to specify which accounts associated with that student will see/complete the form: Enrollee (Family1), Enrollee (Family2), or Families (Both).
NOTE: If you change the assignment option for a form after it has been assigned to enrollees, unassign the form and reassign it to prevent any inconsistencies.
- Category – In which category will this form be listed on the website?
- Priority – Forms are listed on the website first by category, then ordered by priority within the category.
NOTE: You can have multiple forms with the same priority. If you will assign different forms for different grades, you can control the position of each form within the list for each grade.
- Due date – Enter a due date for the form that will display on the website. The Due Date does not have to be a date; you might want to say “Due two weeks after the contract.”
- Warning date – Set this as a date before the due date. When the warning date for a form is reached, the form due date display on the website will turn from black to red.
- Instructions – These will display below the form name on the website. Best practice is to create padding/separation above and below your instructions: add a blank line at the top of your paragraph and two blank lines at the end of your instruction.
Duplicating a Form
You can create a new form by duplicating an existing form that is close to the new form you require. Duplicating forms is useful for creating different versions of contracts, permission forms, or any other form where much of the data is identical but there is some difference.
- Open the original form that you want to Duplicate in order to create a new form.
- Click Duplicate form.

- Your new form will be a full copy of the form, including the field mapping.
- Rename the new form.
- Edit the new form.
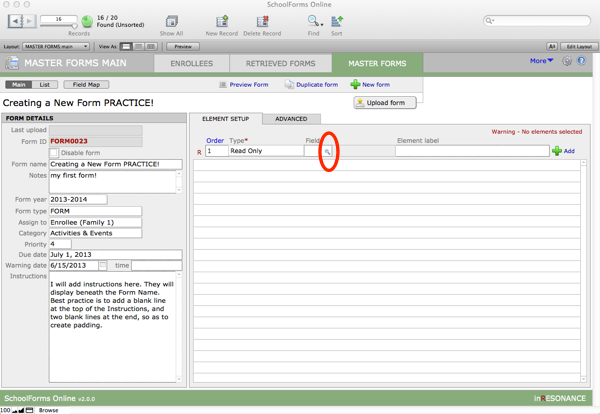
Element Setup
Create new elements by entering data into the top row of the Element Setup window.

- Enter the Order in which the element will appear on the form (1 = top). For ease of creating long forms, you can click on the Order heading to reverse the order of the elements (from first-to-last, to last-to-first) as you work. This changes the list of elements only in this working location; it does not affect the order of elements in the form on the web site. Order numbers can be adjusted as you work on your design.
- Select an Element Type. See the chapter Form Elements Explained for more information on the different element types.

- If you are pre-populating an element from your database, or if you intend to retrieve data and upload it into your solution, you will insert a mapped field into your element. See the next article, on Field Mapping, for more detail.To insert a mapped field you can click on the spyglass icon…
A Choose Field window will pop open in which you can choose a field from your core solution whose data will display in the new field. For each field in the picker list, you can see how the field is mapped (upload only, upload/download).
NOTE: This list is populated from the Field Map. To add fields to this Field Picker list, you must first add the field to the Field Map.
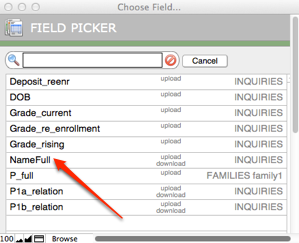
- Click on the field you want. The Choose Field window will close.
An ID number for the field will appear, as will the name of the field you selected. To edit the field choice, click on the spyglass icon.
ALTERNATIVE METHODS:
- Click on the whitespace to the left of the spyglass icon to see a dropdown menu (no search function) of available fields and make your selection.
- If you know the Field ID number of the field you wish to use, you can double-click on the white space to the left of the spyglass icon and type in the ID number of the field.
NOTE: You can edit any element at any time.
- Enter an Element Label. The label displays to the left of your element on the web form.
NOTE: If your element Label requires a carriage return (because you want the line break to appear in a particular place), ADD the ELEMENT first, then go back and add the label.
- Click +Add.
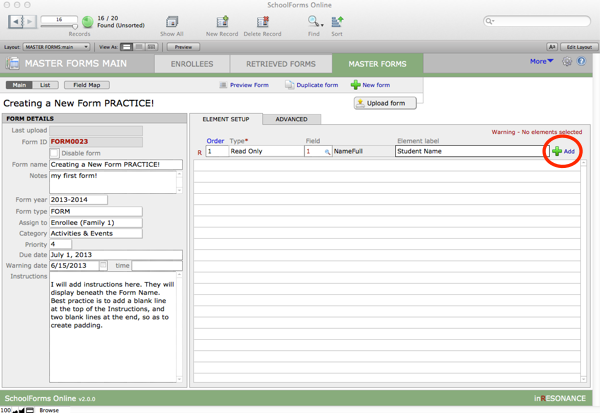
- The element appears in the list below, and the element entry line is blank and ready for you to add another element.
HINT: If a form element appears highlighted in pink, that element is not valid for the Form Type selected. Pay attention to the “Assign To” selection and the table associated with your field in the Field Map. That is, if you have a form assigned to Enrollee (Family 1), but the field map is pulling a field from FAMILIES, the element on your form is not properly mapped.

- Set the element to Required, if desired, by clicking the asterisk at the far left of the line. A red asterisk* will appear next to required items. To remove the asterisk, click the asterisk again. A * indicates the element is required before the form can be submitted.
WHAT THE FAMILY WILL SEE: When you set an element as Required, this automatically adds a note at the top of the published form explaining that a red asterisk indicates a Required field. If a parent neglects to fill in a required field, a warning appears to the right of the element.
How to Set Priority by Category
- Navigate to the main Form Builder view.
- Perform a find for the category you wish to set.

- Navigate to List view.
- Click the Detail screen.

- Enter a numerical priority setting for the individual forms in the Priority field.

Adding detail to an Element
Adding details to an element is covered in depth in the chapter Form Elements Explained.
Next step is to check the Field Map for your form before you Upload it.