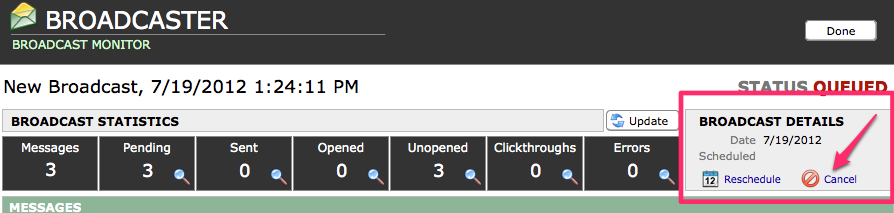
The Broadcast Monitor
As soon as you Send a broadcast, you are moved to the Broadcast Monitor screen. You will see the Name of your broadcast and the Status. If the broadcast has been Sent, the date it was sent is displayed. If your broadcast is Queued, you can Reschedule it here. You may also Cancel your broadcast if it has not already been processed by your server.

You can always navigate to the Broadcast Monitor for any broadcast that is Queued or Scheduled:
- Click on the envelope icon at the top left of any Broadcaster screen, to navigate to the Broadcast List.
- Select any broadcast that is Queued, and click on the main card icon at the far left of the broadcast listing.
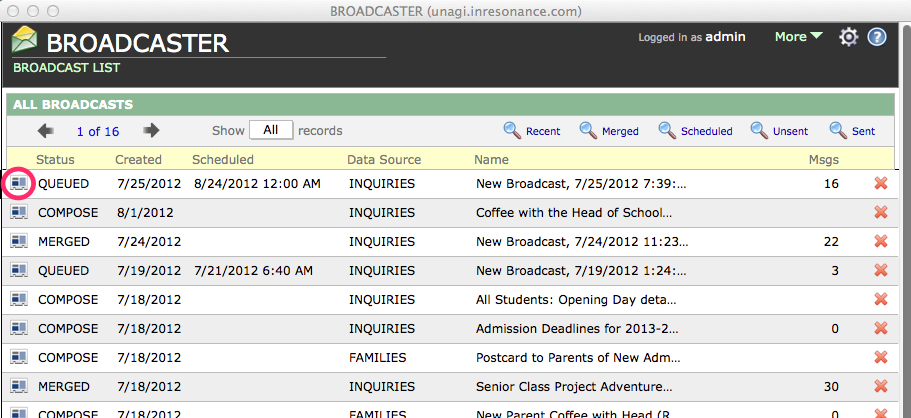
- This takes you to the Broadcast Monitor for that broadcast.
To Cancel a Broadcast
Any broadcast with a status of Queued (unsent/pending) can be cancelled.
- Navigate to the Broadcast Monitor screen for the broadcast you wish to cancel.
- At the right side of the Status area is a box called Broadcast Details. Click on the Cancel icon.
- A dialog box will pop up, prompting you to confirm that you want to cancel the broadcast.
To Reschedule a Broadcast
- Navigate to the Broadcast Monitor screen for the broadcast you wish to reschedule.
- At the right side of the Status area is a box called Broadcast Details. Click on the Reschedule icon.
- A dialog box will pop up, prompting you to enter the new schedule for the broadcast. Fill in the new schedule details and click OK.
Broadcast Statistics
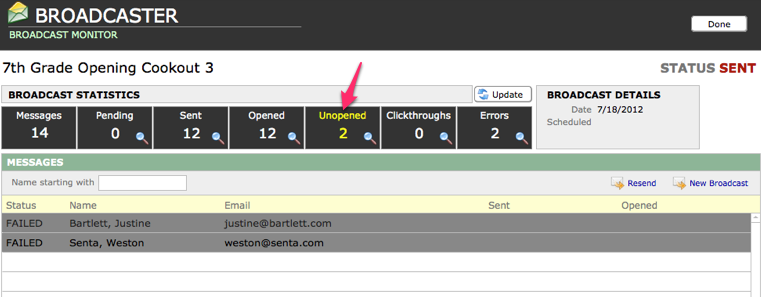
The Broadcast Monitor screen displays Broadcast Statistics, including the total number of messages sent to the server, and, of that total, the number Pending (queued on the server), Sent, Opened, Unopened, how many recipients clicked on Clickthrough links, and the number of Errors (messages not sent).
![]()
Until the time that every message sent has been accounted for, these statistics are dynamic:
- Click the Update button above the black statistics boxes to see up-to-the-minute statistics for a broadcast.
You can see the list of Recipients counted in each statistic. The list of Messages in the list view shows every recipient to whom you attempted to send a message. To see the specific recipients counted for each of the other categories, click on the magnifying glass icon in the black box for that category.
You can communicate again to any list of recipients, or subset of any list (those who did not open a critical notice, for example) from within the Broadcast Monitor. You can Resend the same broadcast, or you can create a New Broadcast for these recipients.
How to Ensure an Accurate Count for “Opened” Messages
The Unopened/Opened count is tallied because there is a tiny invisible embedded image in every BROADCASTER message. The Opened count should be considered a minimum number of opened messages; some who have opened your message may appear as Unopened if the browser in which they opened the message was not displaying images. That is, an individual recipient’s email client may be set to block images. In that case, the recipient may have opened your message but will be reported as unopened, because the invisible image was not displayed. Another reason the Opened count is not the most reliable number is that a recipient may have opened the message, but you cannot be certain that they actually read the content.
The statistic for Clickthroughs is 100% accurate. Therefore, we recommend that you insert a compelling clickthrough link in your message. The Clickthroughs count will show you how many recipients actually responded to the content of your broadcast.
It is up to your discretion whether you make it known to your recipients that you can view if they’ve opened, or clicked on a link in your broadcast. This feature is an analytical tool for your internal purposes, a means to help you learn to create more effective messages, and to help you make a decision whether to resend a message to a group as a second attempt to reach them.
Errors
A message that is counted as an Error is one the server was not able to send out because the email address is not properly configured. This is not the same as an email that bounces back. BROADCASTER will not know if an email is bounced back.
Resending a Broadcast
CAUTION: Please be aware that if you resend an email or create a new broadcast from within a sent broadcast, you are using the email addresses from the ORIGINAL broadcast.
If any of your recipients has changed their email address in the interim, and if that change has been recorded in your solution, your re-broadcast will not have the updated address.
We recommend that, if more than a few weeks have passed since your original broadcast, you start again, gather your new found set and create a broadcast using the original template.
To Resend a broadcast to the entire recipient list, or a part of the recipent list to whom you sent a broadcast previously
- Navigate to the Broadcast Monitor screen for the broadcast you wish to use as your starting point. You can use the main Messages list of recipients, or the list of any subset of that broadcast.
- Click on the black Broadcast Statistics box to select the group to whom you wish to send a new broadcast.
- Click Resend. A dialog box will pop up prompting you to Name your rebroadcast. Name it and click OK.

- You will be taken to the Merged state of your Broadcast Assistant: Send Broadcast screen, in SAFE MODE, for your new rebroadcast. Resend presumes you want to use your original message.
- From this point, you can either GO BACK and edit your message, or Test one, Preview and Send this new broadcast by clicking on the Toggle Mode button to go to LIVE MODE.
To create a New Broadcast to the entire recipient list, or a part of the recipent list to whom you sent a broadcast previously
- Navigate to the Broadcast Monitor screen for the broadcast you wish to use as your starting point. You can use the main Messages list of recipients, or the list of any subset of that broadcast.
- Click on the black Broadcast Statistics box to select the group to whom you wish to send a new broadcast.
- Click New Broadcast.
- You will be taken to the Broadcast Assistant: Choose screen, to begin composing your new broadcast.
Viewing SENT Messages
Once a message has been sent in BROADCASTER 3, the broadcast is locked. You cannot view the individual Sent messages inside BROADCASTER 3.
You can:
- View Broadcast Statistics for the Sent broadcast, select a category with very few recipients (even the Failed set), and click Rebroadcast. Then Preview to see the message.
- View the message if you saved it as a Template.
- Look in your own archive of email messages: When you Send a broadcast, always add yourself as the one to receive the confirmation email—you will receive a copy of the email for your records. Keep an archive of all sent broadcasts for future reference.

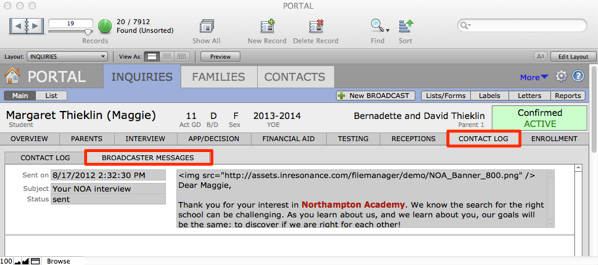
- In PORTAL, you can view individual broadcast messages inside the Contact Log for an individual recipient. When you send a broadcast, the email is automatically added as a record to the contact log of each recipient whose message was sent (i.e. not failed).