The workflow for creating accounts in FAM is:
- Publish students and families to the web site.
- Sync accounts.
- Enable access to accounts.
- Resolve conflicts.
- Test the web site.
- Notify accounts.
Publish data to the web site
If you are working in FAM, publish all currently enrolled students, and their related families, to the FAM web site.
NOTE: You cannot create an account if the student and family data has not been published to the web site at least once.
- Refresh accounts in iRCOMMON.
- Click on the gear icon in the top right status area to enter FAM Preferences.
![]()
- In FAM Preferences > General Tab, find the areas called Website and Family Data to Publish. Define what information you want to publish.
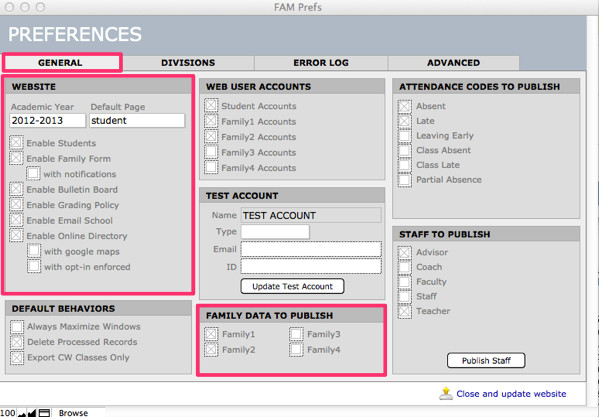
- Find the area Web User Accounts. Define which accounts you will create.

- Click Close and update website.
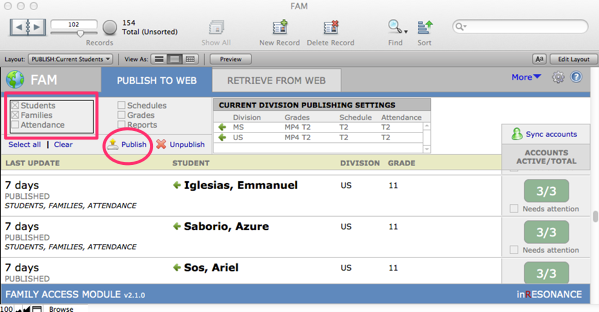
- You will be returned to the Publish to Web page.
- Publish Students and Families to web.
- Click Close and update website.
Sync accounts
Sync Accounts identifies all the potential accounts/roles that are appropriate for your web service.
NOTE: Sync Accounts works on a found set. If you want to sync accounts for all students, select Show All records before you perform the sync. If you wish to work on only one student, do a find for that student (or group of students) before you perform the sync.
- Perform a Find to gather your found set.
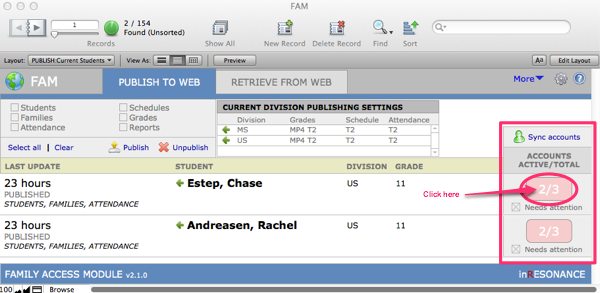
Look at the right hand column of the Publish to web page.
- Click Sync accounts.
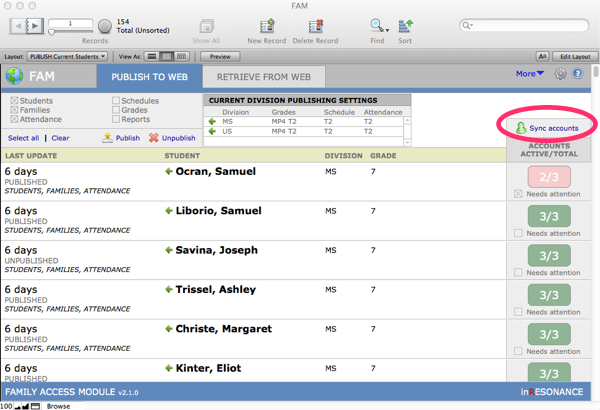
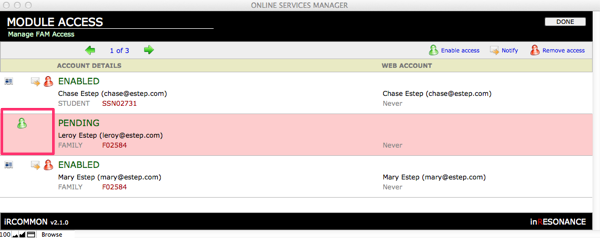
The Module Access screen opens, displaying a list of all possible accounts/roles for this web service (FAM). Note that you have entered iR COMMON, but you are looking at a filtered view specific to your web service.
Enable access
In the Module Access screen, buttons that appear in the task bar across the top of the list—Enable access, Notify, Remove access—will act on every record in the found set.
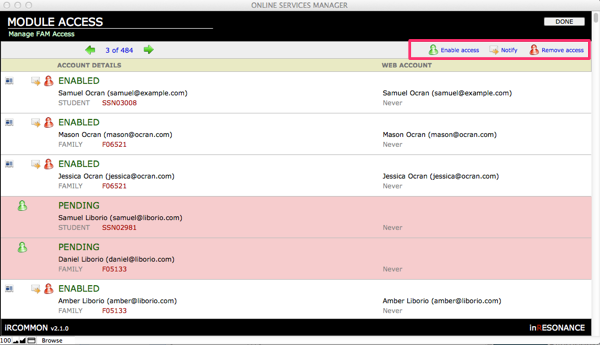
Click the button in the top task bar to Enable access for the found set of accounts.
- Scroll through your list to find highlighted records. These highlighted records have errors or conflicts that need to be resolved.
- White records (no highlight) – This role is Enabled for this account.
- Pink highlight – This role is Pending, not enabled. This usually indicates a conflict because one email address is being utilized by two people in this account family.
- Orange highlight – The role is attached to an account, but there is a conflict with data in the account family.
Review your accounts
There are two kinds of review to perform as you prepare web services accounts:
- Resolve conflicts caused by duplicate email addresses (Module Access screen, after a Sync).
- Review active accounts / total possible accounts, especially those that are flagged by the system as Needs attention (Publish to Web screen).
Resolve conflicts
Web services accounts are created based upon an email address. Each account must have a unique email address.
If there are two records in Module Access with the same email address, one account will be flagged as having a conflict.
- After a Sync, scroll through your list to find highlighted records. These highlighted records have errors or conflicts that need to be resolved.
- Click Resolve conflict. A window showing the detail of the account will open.
- Determine whether the information at the top is correct (name, email, ID).
- If the information is incorrect due to a data entry error—such as a typo in the email address, for example,
- Correct it in the source (your core solution—FAMILIES or PERMRECS).
- Return to the web services file (FAM) and Sync accounts.
- Find the account and enable it again.
- If the information is incorrect either because an account was created with incorrect information, or because the ID used to create the account is no longer correct, as after a divorce,
- Select the correct account or enter a new email address.
- Click Enable access. If the account already had a different role for the same module, that role will be overwritten.
- If the information is incorrect due to a data entry error—such as a typo in the email address, for example,
- Repeat until all accounts have been created and enabled.
- When you are satisfied, click Done. You will be returned to the FAM Publish to Web screen.
NOTE: If ever you want to return to the Module Access screen, perform a Sync. There is no penalty affecting the work you have already done creating accounts if you perform a sync.
The following training video provides helpful insight to resolving common account issues.
Please visit the iR Common Resolving Conflicts page for written instructions.
Review active accounts
Check to see that all of the accounts you wish to activate are ready. In the Sync accounts column, accounts that are fully ready are green. Accounts that require review are pink.
- On the Publish to Web screen, perform a Find for any records where Needs Attention is checked. Accounts that need attention are those where not all of the total possible accounts for a student are active.

- Click into the pink ACCOUNTS ACTIVE/TOTAL button to see a list of all possible accounts related to a student.
The Module Access interface will show you all the possible actions you can take for any one account. The buttons on the left act upon only the individual record.
NOTE: You do not have to enable every account. There will be cases where you do not want to enable an account.
- Decide if you wish to enable the accounts with a Pending status. If yes, click on the Enable access (green) figure.
- Click Done.
- A dialog box will appear to confirm your action.
Next step: impersonate a student and a family, to test your website.